
Since my last post the remainder of the lords on the map have used their muster actions. The two Russian lords mustered their own vassals to increase their troop strength. The Teutonic knights also mustered vassals and in addition, Lords Knud & Abel mustered ships.
Now that we are properly geared up, the Teutonic invasion of Novgorodian Russia can begin. Let’s get oriented first:

The Teuton Lords are represented by black cylinders on the map; the Russian Lords are white cylinders. You may have noticed the gold ring around Herman’s marker. This denotes his status as a marshal. He can command other lords (take them with him) during his actions.

The map shows Teuton lands with a grey tint while the Russian lands have a reddish tint. To take levy actions a lord must be in a friendly locale when the Levy Phase begins. The only way to make an enemy side of the map a “friendly locale” is to conquer an enemy stronghold.

To win the game you must collect more victory points than your opponent. You gain those victory points by ravaging enemy holdings, destroying their armies and conquering their strongholds. In this short scenario the Russian player starts with 1 VP already in the bank. The onus is on the Teuton Lords to invade. Let’s get to it!
Before we start stomping about the map each side must create a command deck. You build command decks from command cards; each lord has three. This is what one of Hermann’s command cards look like.

It is currently summer so our command deck needs to have 6 command cards. The deck is made from command cards for the lords who are currently in play. You make a new command deck for each successive campaign season.
Players will take turns drawing cards from the command deck to determine which lord is up next. The cards also show the Lords Command Rating. Hermann has a command rating of 3 which represents the number of commands he may take when his card is drawn. Players alternate drawing command cards from the deck until they are gone. Once both players’ decks are empty, the Campaign Phase of the turn ends.
Here is what is in the Teuton’s command deck looks like:

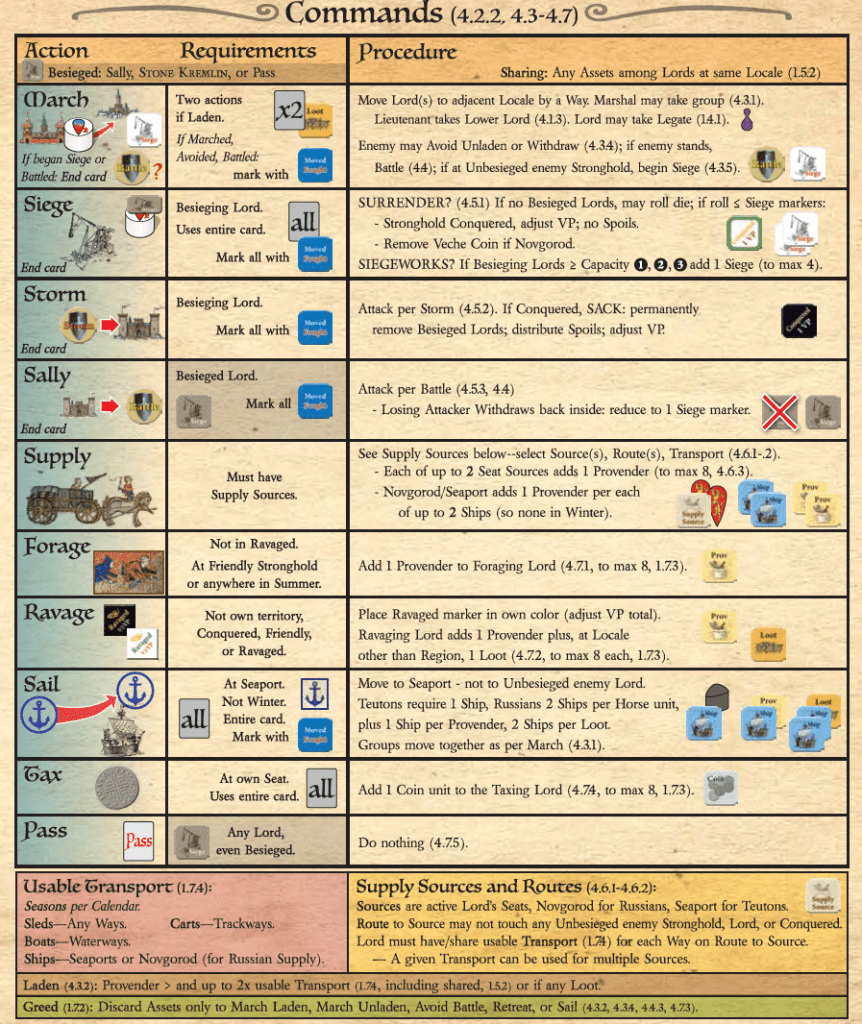
In Nevsky the Teutons go first (they started the crusade) so we draw Hermann’s first command card and he gets to select 3 actions from the following list of possible actions:
In a previous play through of this scenario I moved Herman directly to the nearby stronghold of Pskov and placed it under siege. This did not work out well for several reasons. First, you only have 2 turns in the scenario to siege and storm. It is barely enough time so getting it done requires quite a bit of luck. That strategy leads to an all-or-nothing storming of Pskov for the win or defeat. For this playthrough, I am going to try instead to ravage my way to victory. I have no idea if this will work but I think its worth trying. We will soon see.
Hermann has the first card:
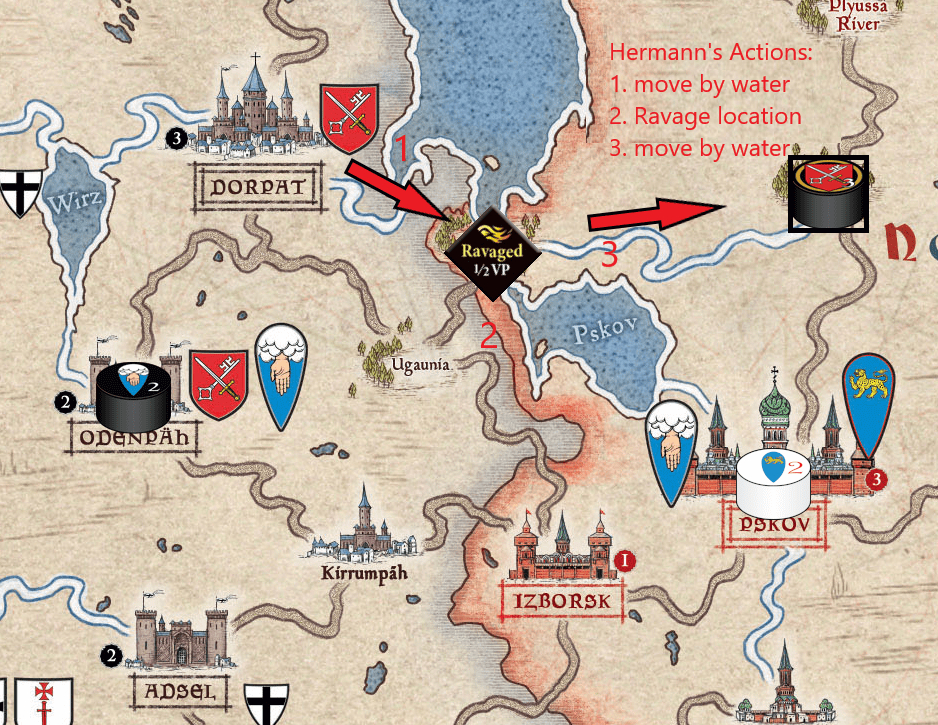
Herman takes the march action and moves (1) to Uzman by boat. The boat transport is necessary because Hermann is taking provender with him and it must be transported. Moving also tags him with a moved fought marker.

Next Hermann will ravage Uzman (2) which gives the Teuton side 1/2 VP (victory point) and Hermann gets another provender. This gives him a total of 2 provender which he can carry because he has the 2 boats on his mat. For the last command, Hermann will march again (3) to Zhelcha River where he intends to ravage when his next command card is drawn. Herman’s mat has changed since the start of his turn and now looks like this:

Since Hermann has a moved fought marker on his mat he must expend a provender to feed his hungry vassals and their troops. Hermann can then remove the Moved Fought Marker and end his activation. If Hermann could not feed his army, it becomes more likely his troops will quit the field and return home. Having unfed troops causes service duration reductions.
The Russian player is up next and will need to figure out how to respond to the ravage strategy. I will cover the Russian response in my next post.
