
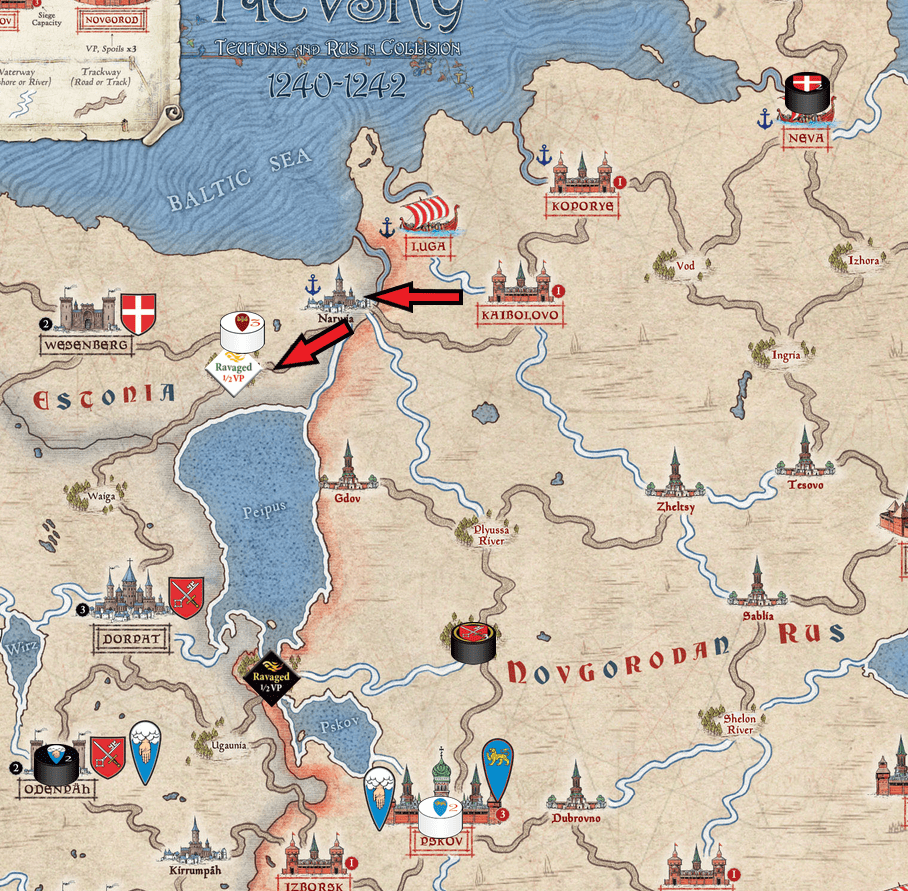
We begin with the Russian Lords playing their 2nd card. The Russians draw Vladislav again. We will continue with our plan to cross the border and begin ravaging the Teutonic lands. Vladislav uses his first 2 commands to continue his march westward. He uses his last command for the turn to ravage Wierland. This gives him a provender and 1/2 VP for Russia.
Since Vladislav marched he gets a moved fought counter. Conveniently he just picked up a provender from the ravage so he can once again feed his hungry troops.
Incidentally, large armies with more than 6 units require 2 provender to remove the moved fought marker. This is going to be a problem for Knud & Able as they have 7 units.
Vladislav has used all of his actions and fed his troops so the command card is discarded and play goes back over to the Teuton player. The Teutons draw the next card from their command deck:

Hermann is up again. He has three actions and an interesting decision to make. He is in range and could intercept Vladislav and try to put an end to his counter-raiding with a battle. To do so Hermann would have to march twice (using boats) to reach Narwia then take the track to West to intercept Vladislav in Wierland.
Hermann, however, would have to abandon his provender in Narwia because he did not levy carts so can not haul provender across land. This means he would arrive in Wierland without provender to feed his troops.
The other problem with this option is that Hermann would have to forgoe ravaging in Russia which was the game plan. No ravage, no VP.

Hermann decides to stick with the plan. He uses a command to ravage his current location at Zhelcha River. Next, he marches North to Plyussa River but must leave behind the provender he obtained by raiding Zhelcha River. Again no carts so he can’t haul all of the food. The final command is used to ravage Plyussa River and by doing so obtains 1 provender and can feed his troops. The 2 ravage commands give the Teutons a total of 1 VP.
We have briefly discussed the consequences of hungry troops in past posts. Given that Hermann had to abandon provender this turn, I thought it would be good to explain how hungry troops reduce a lords service.
There is a calendar on the top of the game board that is used to track lord service time, game turn and victory points. This image is the part of that calendar covered by this scenario.
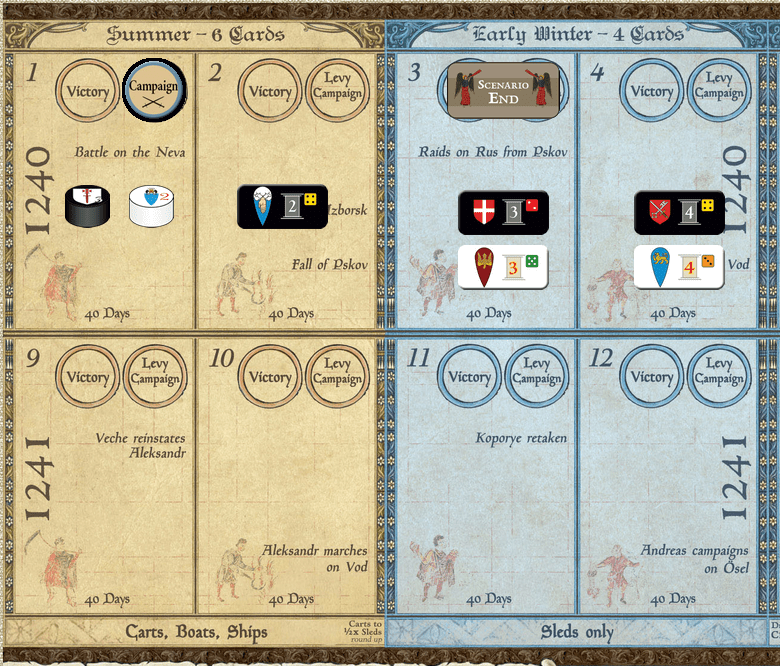
We are currently in the Campaign Phase of Turn 1. You can see the blue circled marker currently on its “campaign” side in box 1. You use this marker to keep track of the turn and the phase. It’s on its “Campaign” side; the other side reads “Levy.” When the turn advances we will flip the marker back to its levy side and place it in the turn 2 box.
The two cylinders in box 1 are lords that could have been potentially mustered in this scenario. We did not spend levy actions to attempt to muster either of these lords so they remain in their keeps.
Each lord also has a rectangle shaped service marker that bears that lord’s unique crest. Russian markers are in white and Teuton markers are black. The service marker shows the lord’s service rating and fealty roll. The service rating is the number of turns the lord will serve before returning home. The dice icon is the fealty roll. It shows the number or lower required on a roll to muster that lord. It is good that Knud & Able started the scenario mustered because you would need a roll of 2 or lower to muster them.
A player that can’t feed his troops after move or fight commands must shorten the affected lords service by a turn. To show this, the service marker is slid left on the calendar to track the loss of service time. If a lords service marker is in the current turn’s box, then that lord must disband unless the player can pay to extend the service. Payment to extend service is usually with coin gained through the tax command.
