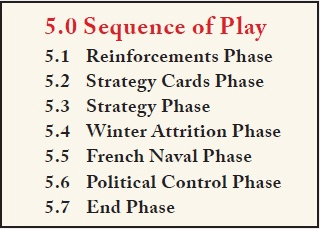
In the last post each side had played their final cards of the strategy phase. We will round out the 1st year of the war with a few administrative phases. As a reminder here is the sequence of play again:
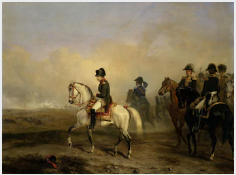
Next up in order is the Winter Attrition Phase which we touched on a few times earlier. Let’s do the British first. The Redcoats, being a professional army without agricultural duties to see to in the fall, are less susceptible to attrition. Any British troop below the attrition line on the map or in a Winter Quarters space are immune to attrition.

Cornwallis is North of the winter attrition line (white and blue snow flake line just south of Virginia) but they are in a Winter Quarters space which protects against attrition. Winter Quarters spaces are identified by the square shape of the space.

Fortified Ports (star shaped) are also considered Winter Quarters space. General How is in Boston which is also a square space so the British suffer no attrition to their armies for the first turn.
The American units will suffer some attrition. They cannot hide in a Winter Quarters space. There is one exception, up to 5 units stacked with General Washington are immune to attrition. The rest of the troops, regardless of location, suffer attrition. This is half the stack rounded down. General Greene starts with 3 units, half is 1.5, rounded down to 1 leaves him with 2 units. General Washington in the North will keep his current 5 unit army.
The Next phase would be moving the French Navy. The French have not yet joined the fight so there is nothing to do in this phase. To get the French on board you must advance the French Alliance marker to 9 points on the French Alliance Track.

Here are the ways to move the French Alliance Marker:
- Each time the British lose a battle, the marker is advanced +1 space.
- If the British lose the “Regulars” advantage (for any
reason), the marker is advanced +2 spaces. - When the “Hortelez et Cie Clandestine French Aid”
Event Strategy Card is played as an event, the marker
is advanced +2 spaces. - When the “Benjamin Franklin: Minister to France”
Event Strategy Card is played, the marker is advanced
+4 spaces. - If George Washington is captured (and consequently removed from the game), the marker is decreased -3 spaces (away from the “French Alliance” space).
The Political Control Phase is next. Again there is not much here yet. The Continental Congress is still in place in Philadelphia and does not need to be relocated. There are no isolated political control markers for either side to remove. So we move on to the final stage of the turn.
In the End Phase we check for victory. Neither side is close to victory so we reset things for the next turn of the game. After the turn marker is advanced we would then start turn 2. With that I will end my exploration of Washington’s War.
I think we have covered the main game concepts relatively well. Anyone who read my posts on Washington’s War should have a good general idea of how it plays. It is a basic card driven wargame with few systems at work. You goals and objectives are clear for either side of the conflict. The event cards are easy to understand and the combat is straight forward. Washington’s War is easy to recommend and would be a great starting point for anyone with an interest in card driven wargames.
Subsequent card driven games have built on this title to deliver more complicated systems and cards. There are many fascinating permutations of the system to explore. Once you learn one card driven wargame you have dozens of games that use similar mechanics that are easy to pick up quickly. Many of them build gradually in complexity so you can pick and chose how much detail you like in your games. A wide variety of historical periods and subjects have been covered by card driven designs. You have a lot to chose from if you have an interest in this type of game.
I hope the playthrough was useful to you, until the next one, cheers.
