Categories
Board Wargame Tabletop Board Game Washington's War

Card Driven Wargames Exploring Washington’s War / Part 4

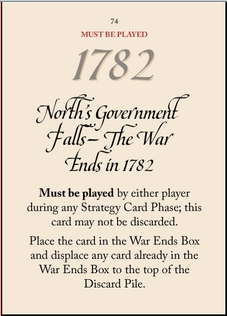
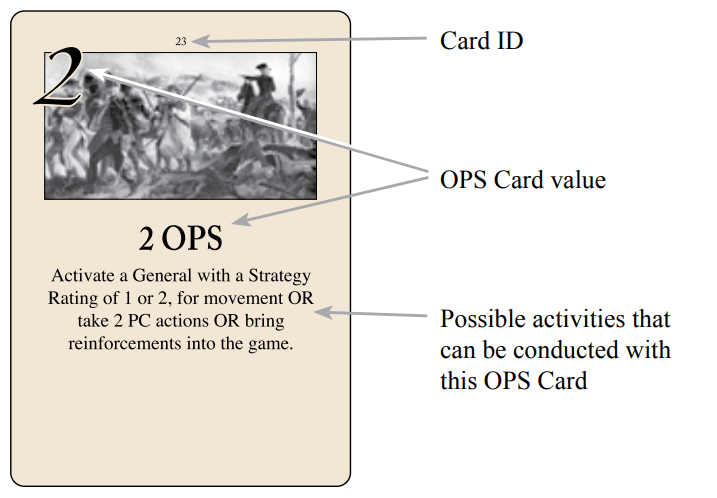
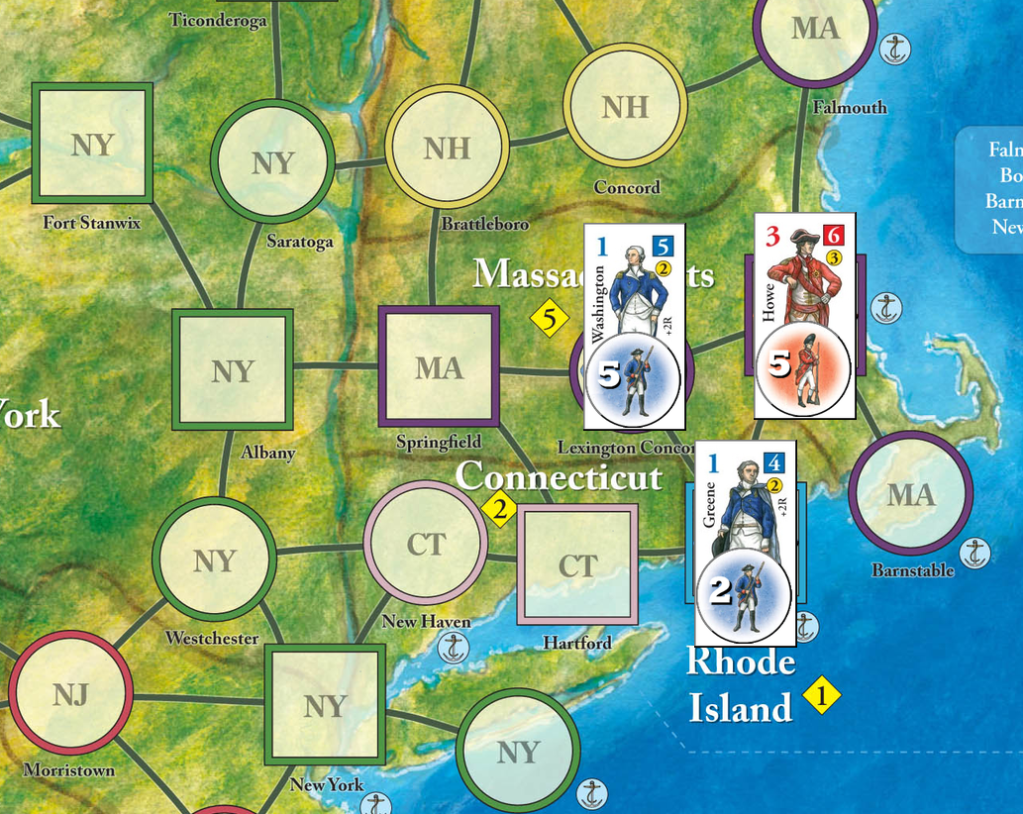
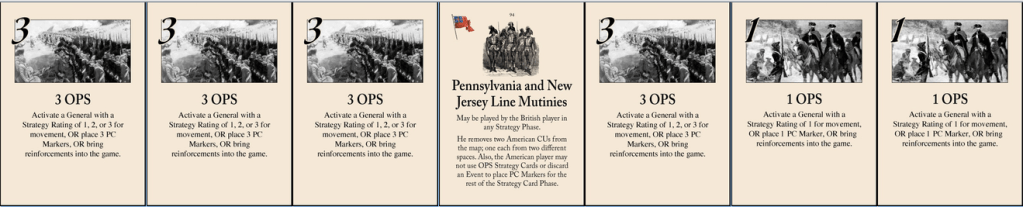
The British enjoy a card advantage as we head towards the end of the first turn. They are holding a couple of 3 OPs cards and 1 event card. The British have been paying attention and know that the American has only 1 card left to play. This will give the British 2 consecutive Operations at the end of the turn; a nice advantage as the turn expires. The Brits begin by playing their event card:

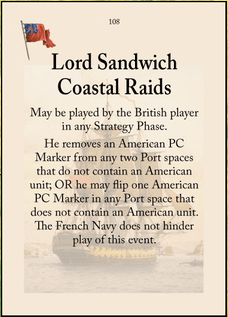
There are 2 options and the British elect to flip New York City back to British political control. Having a port in New York feels pretty critical and being able to flip it without taking a turn to place an army in New York seems pretty good.

The American is up with their last card. Note that you are not allowed to pass and hold a card so the American is compelled to play the remaining card now.

There is an important topic we have yet to discuss that is becoming increasingly relevant in this game. Your political control markers are subject to becoming “isolated.” If a marker is isolated at the end of a turn then they are removed from the map. An American political control marker becomes isolated if it cannot trace a path to:

  • an uncontrolled space that does not contain a British
    CU, or
  • a space containing the Continental Congress, or
  • an American controlled space containing an American
    or French CU, or
  • an American controlled space containing an American
    or French General.

Note that an American General on a British space is not a valid source for maintaining an isolated marker. The British player has similar rules with the addition of all ports being a valid trace location. Its that naval advantage paying off once again for the Brits.

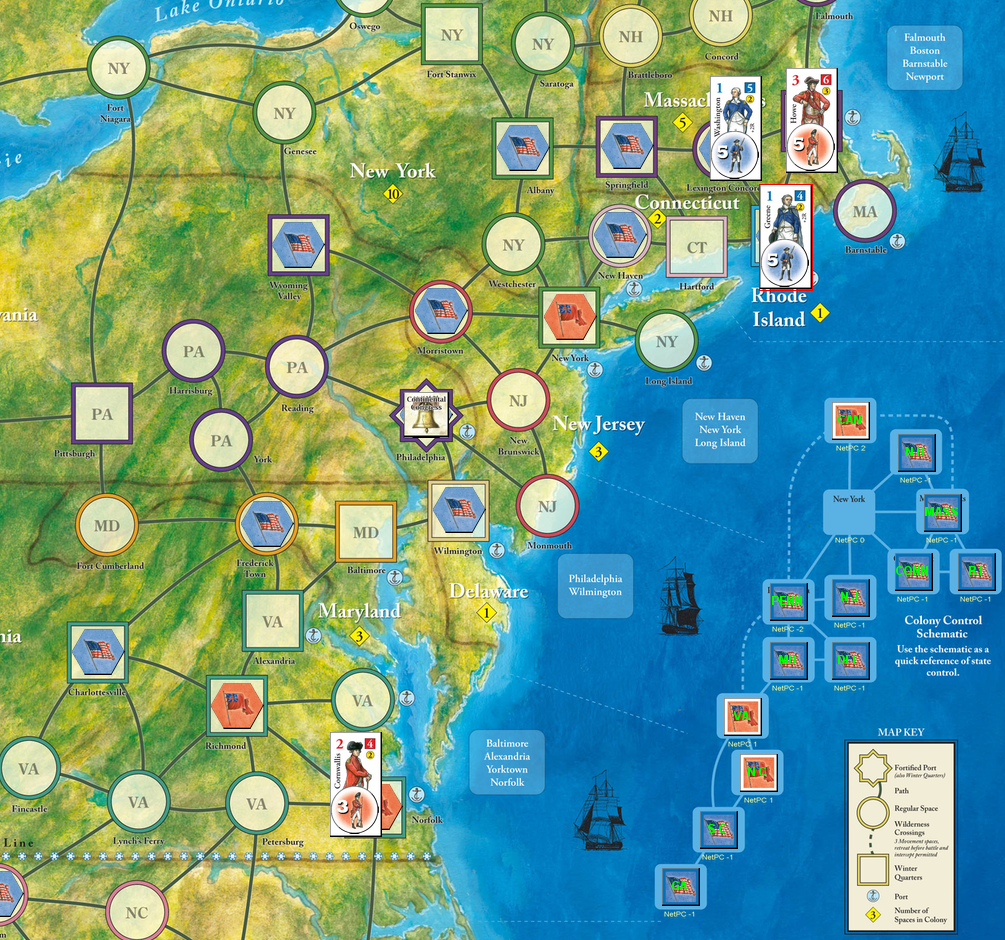
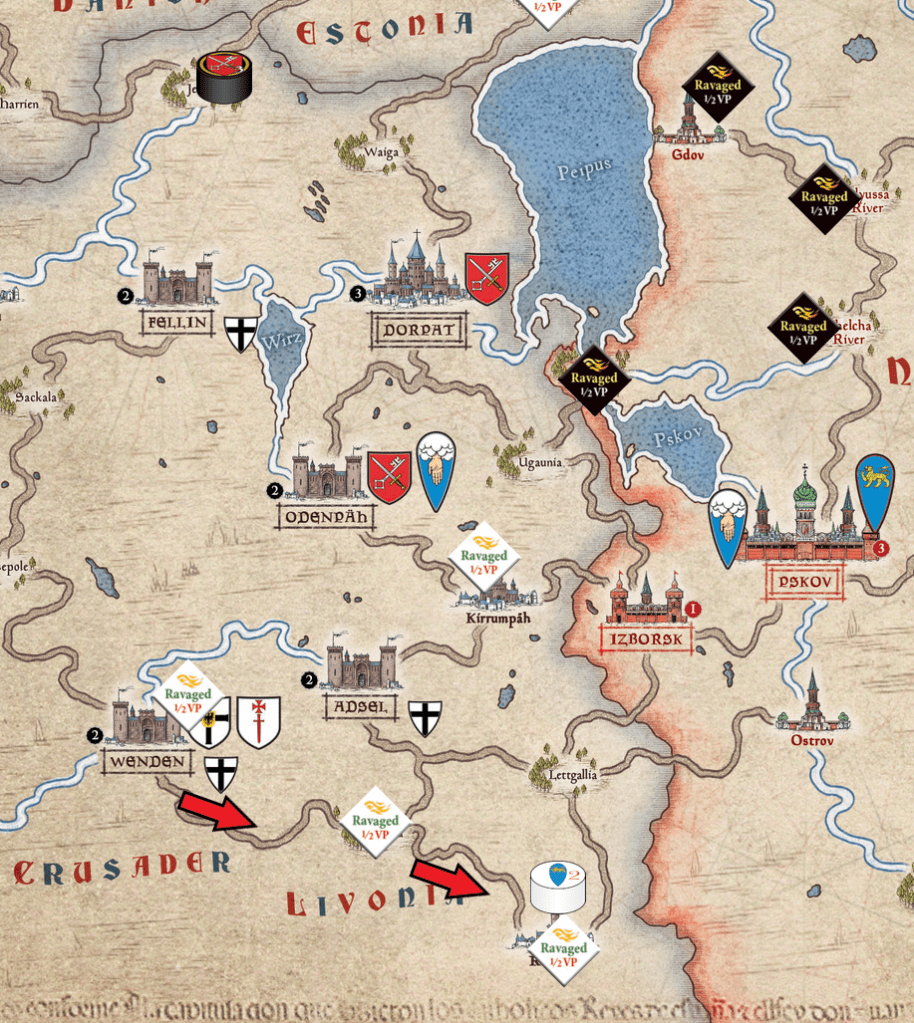
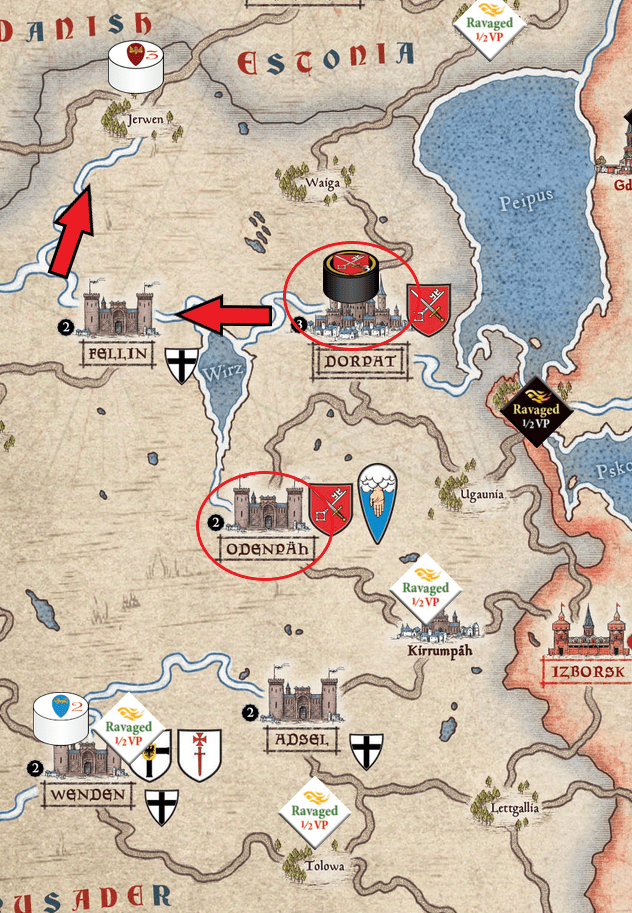
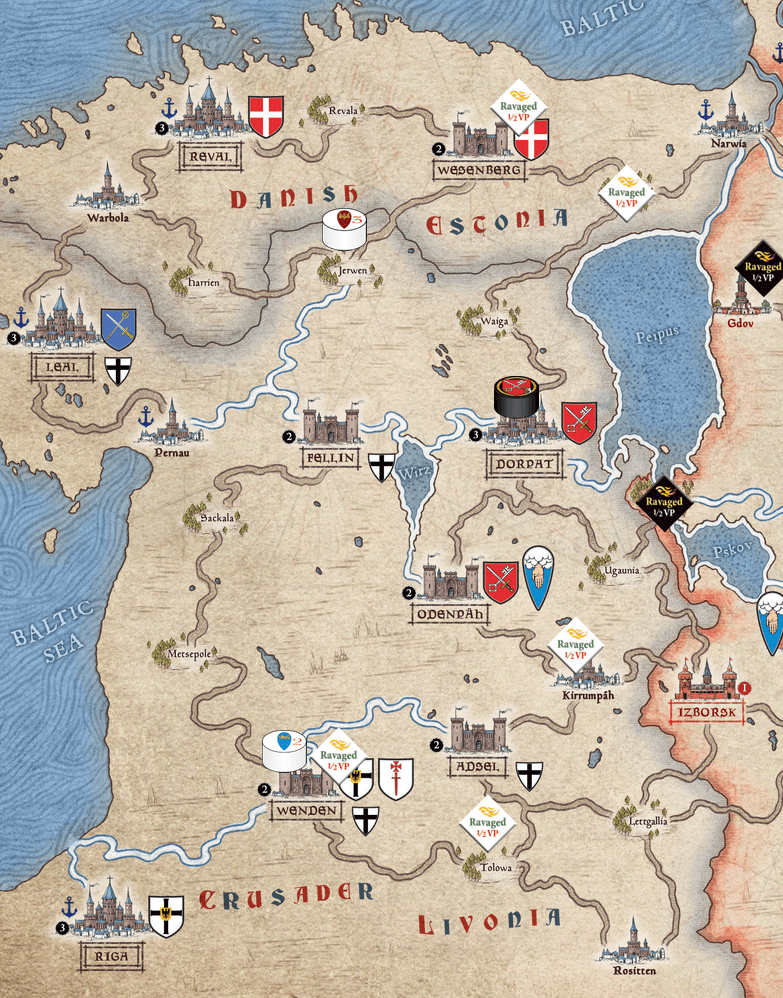
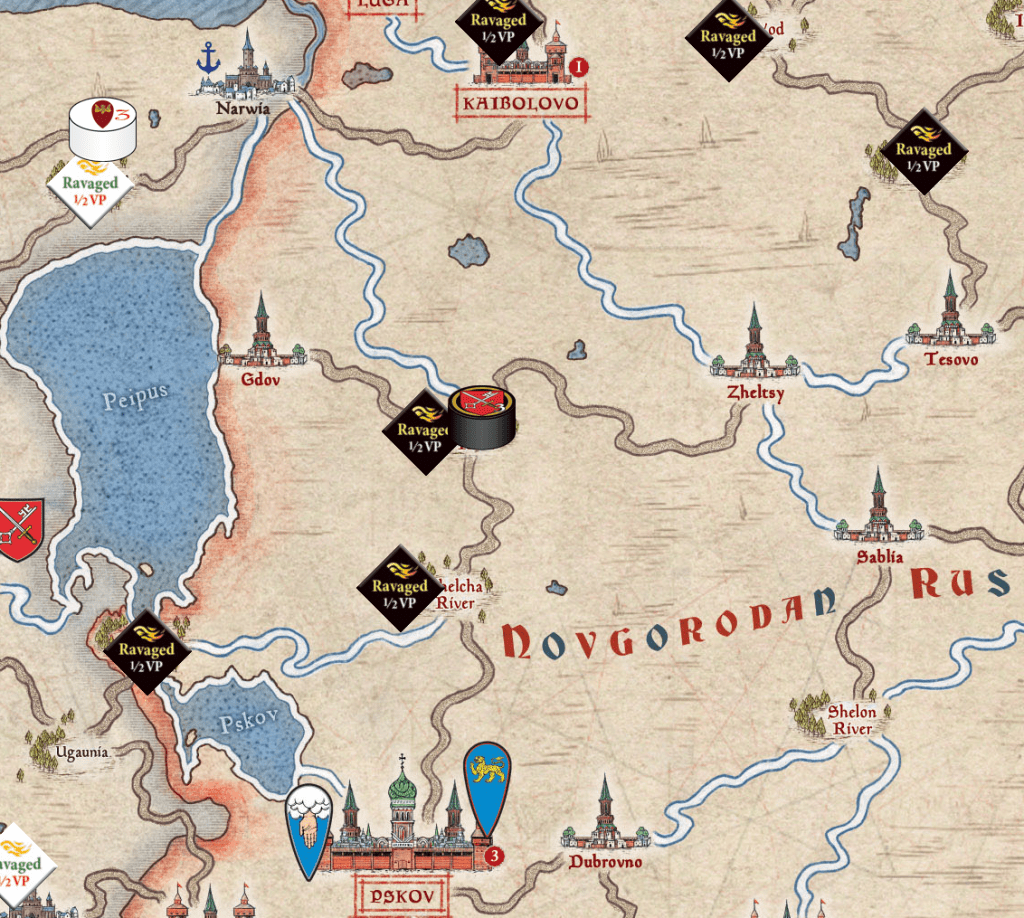
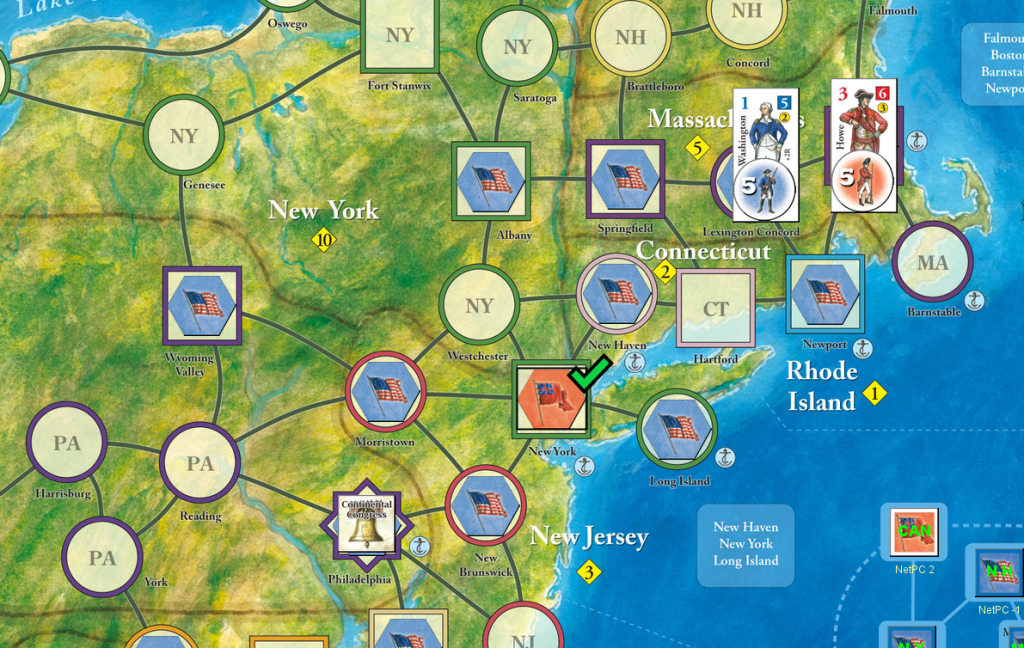
Since we are approaching the end of the turn it makes sense to evaluate the map to see if we are at risk of losing our hard earned political control markers. Here is the current situation:

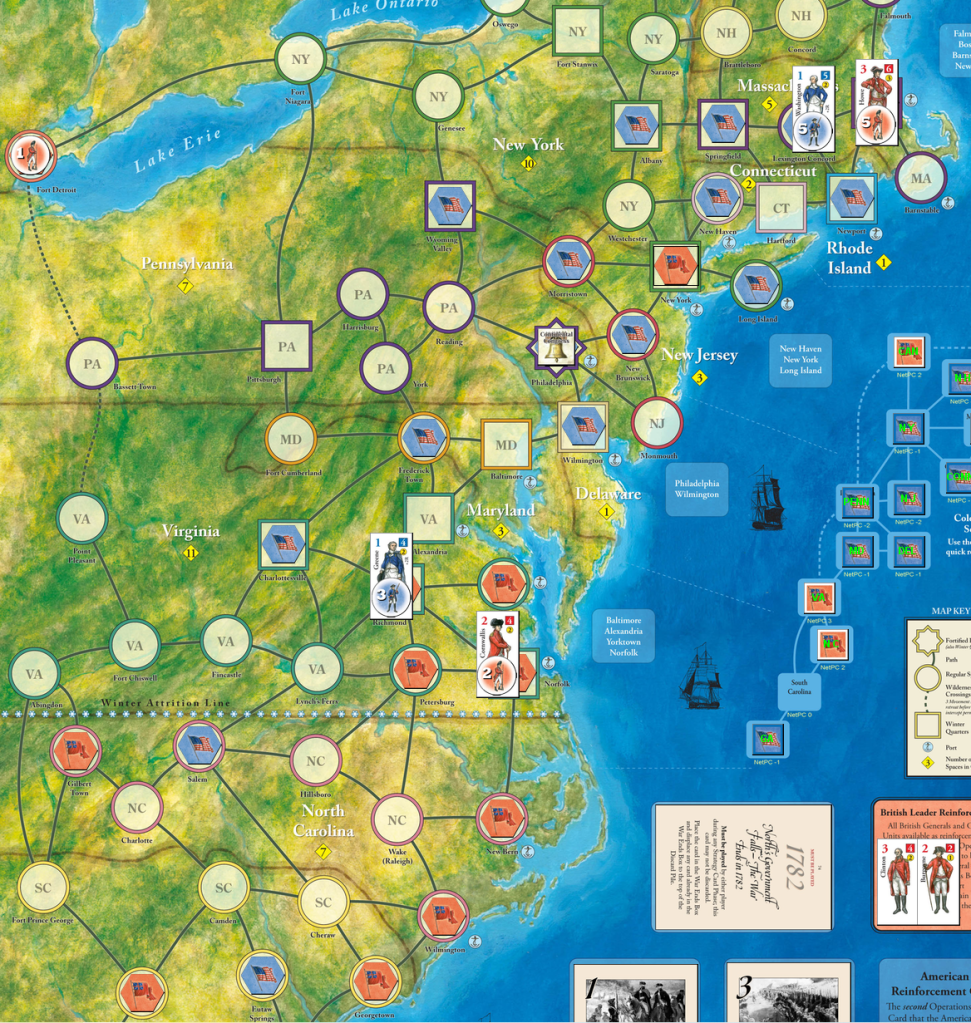
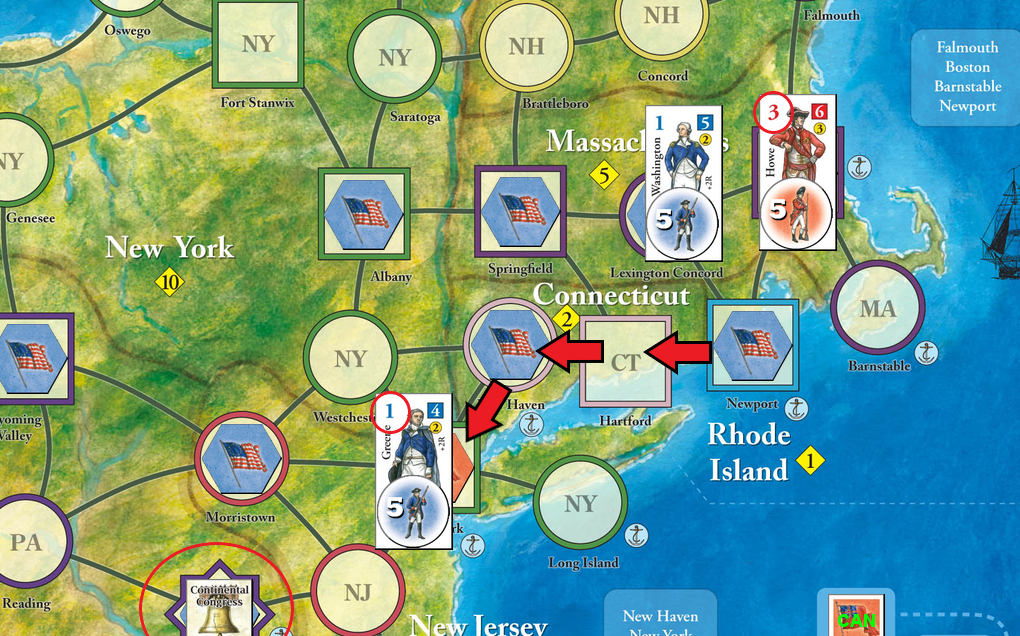
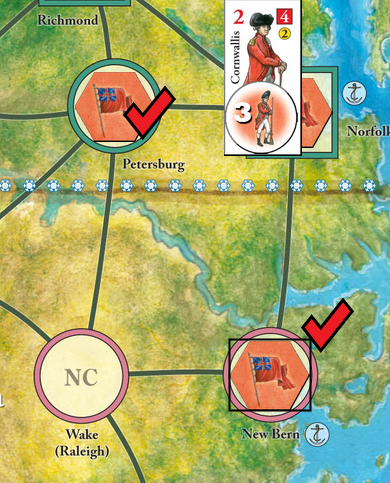
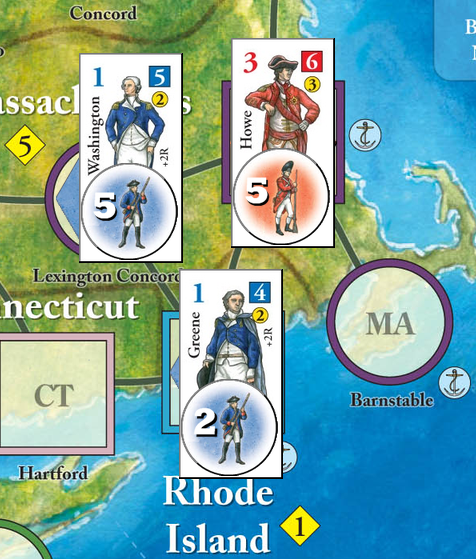
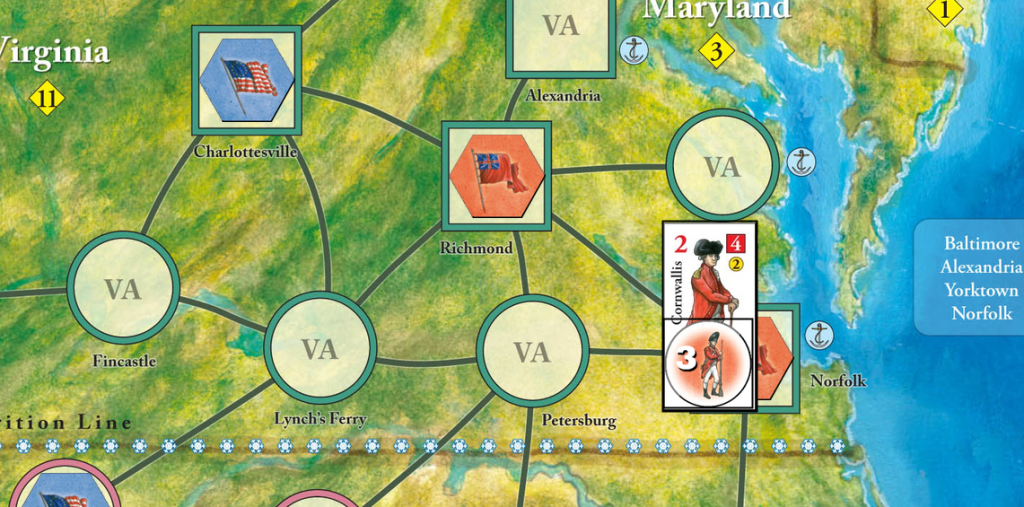
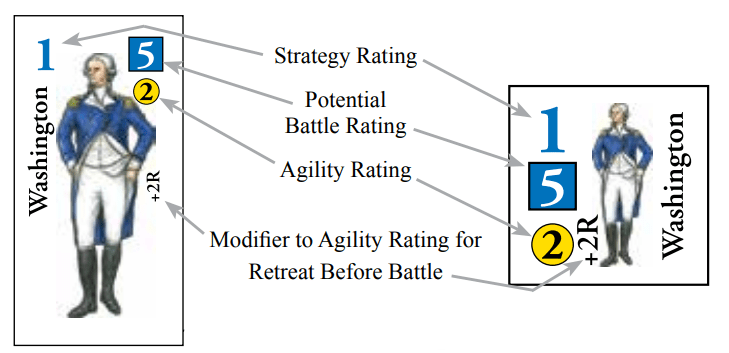
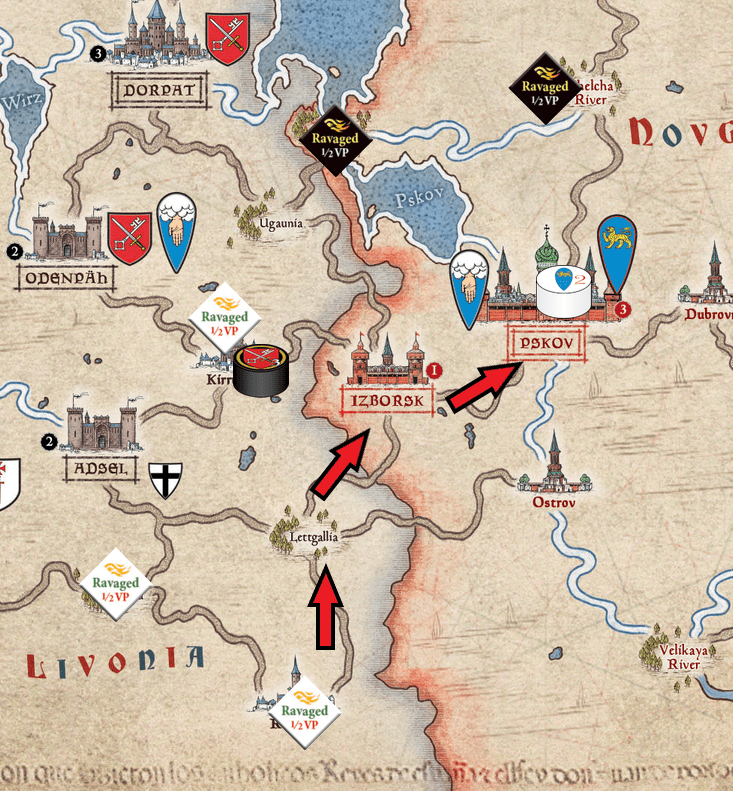
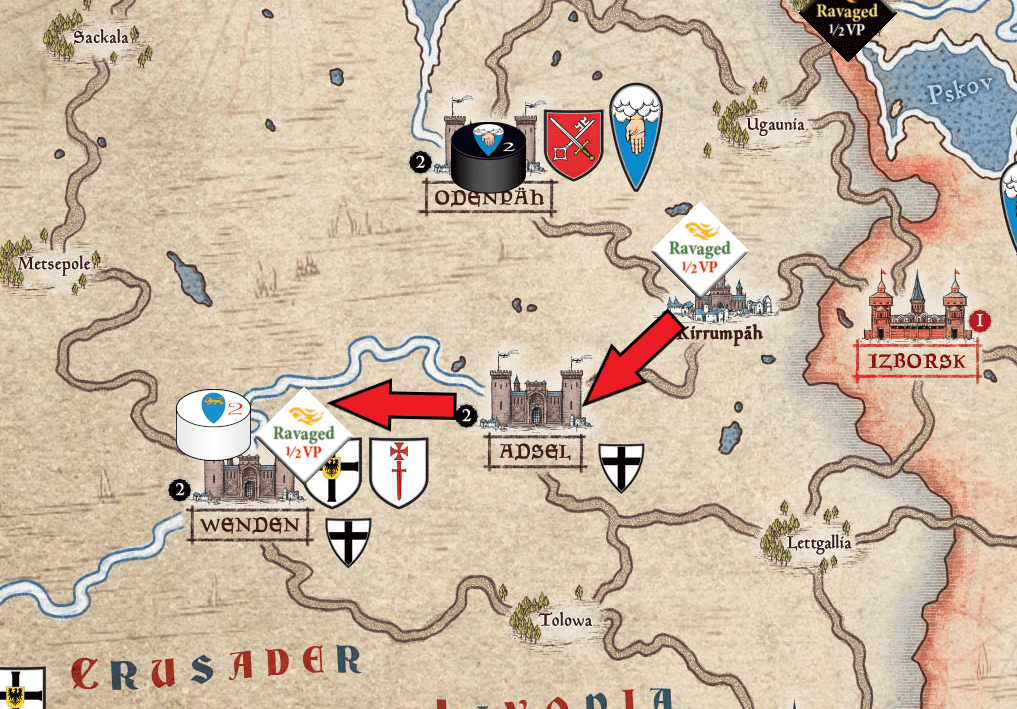
After some consideration and head scratching the Yanks settled on Richmond, Lynch’s Ferry and Brattleborow. Richmond was flipped primarily because General Greene is not a trace location if his space is not American. By flipping Richmond, Greene can maintain any marker that can trace a path to him. The Brattleborow marker was placed to link up the Northern markers and to block east west placement of markers from General Howe’s location. The marker in Lynch’s Ferry also connects markers with General Greene preventing other markers from being easily isolated and removed. Here is a zoomed out map with the locations checked.

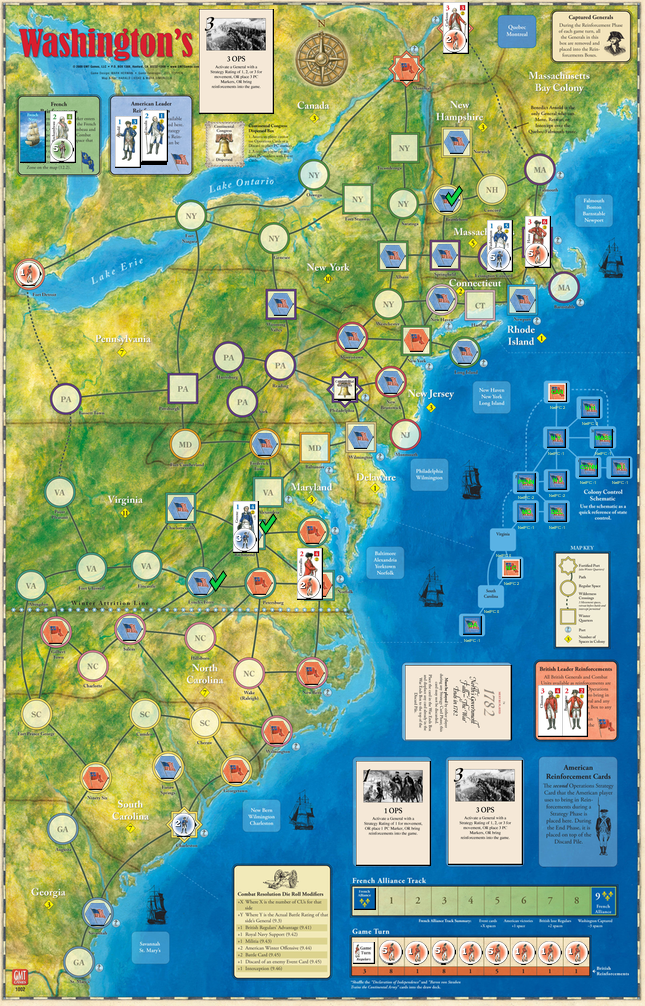
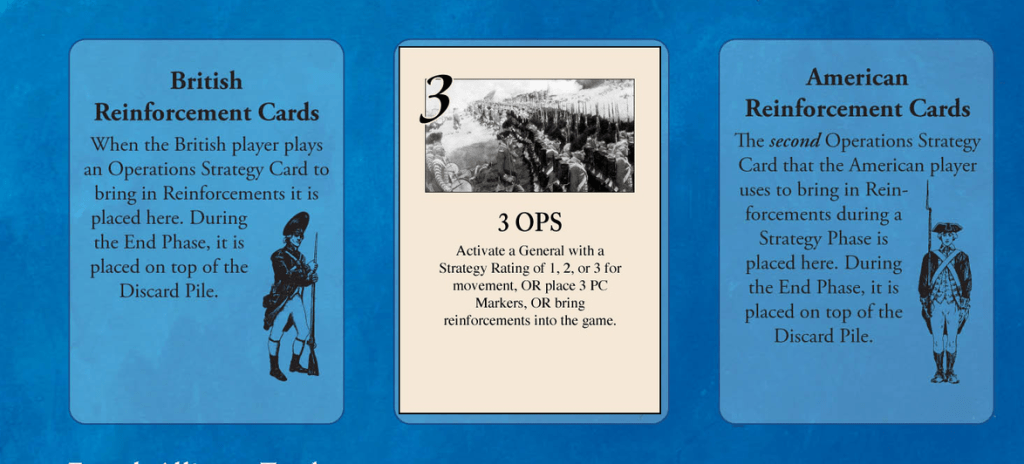
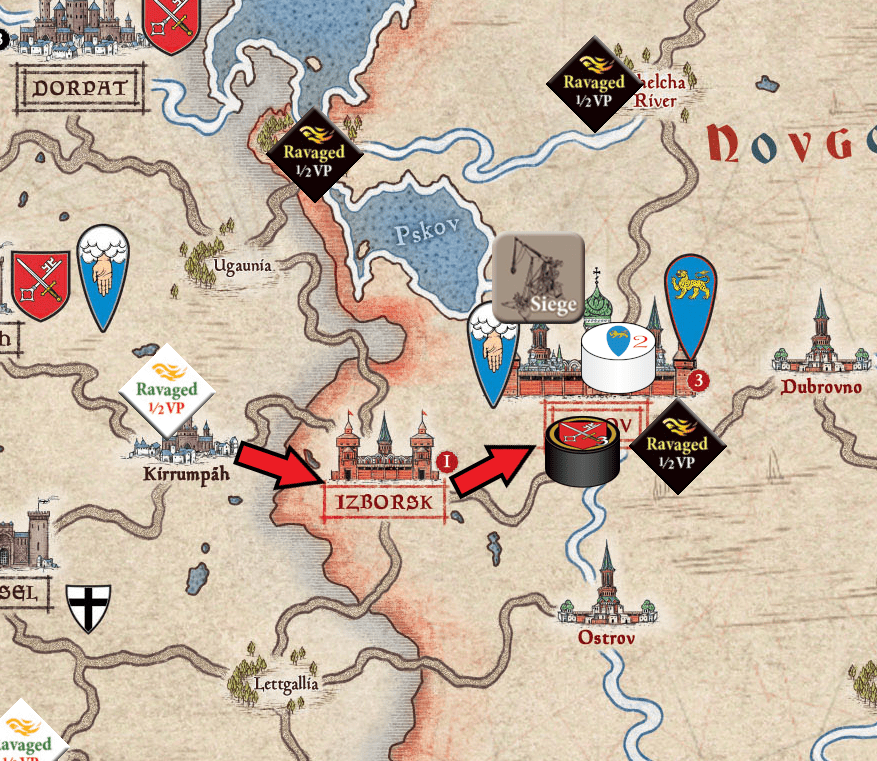
Brits are up and they play a 3 Ops card for 3 political control markers. At present the Americans control most of the colonies. The Vassal interface keeps track of who controls each state with a “Colony Control Schematic” printed out in the Atlantic Ocean. It shows which side owns each state at a glance. Here is the current status of political control:

The Colony Control Schematic updates as tokens are placed on the main map. Britain has work to do, at present they only control Canada and North Carolina. Spending Ops to control of a few more states seems like a good play for Britain.

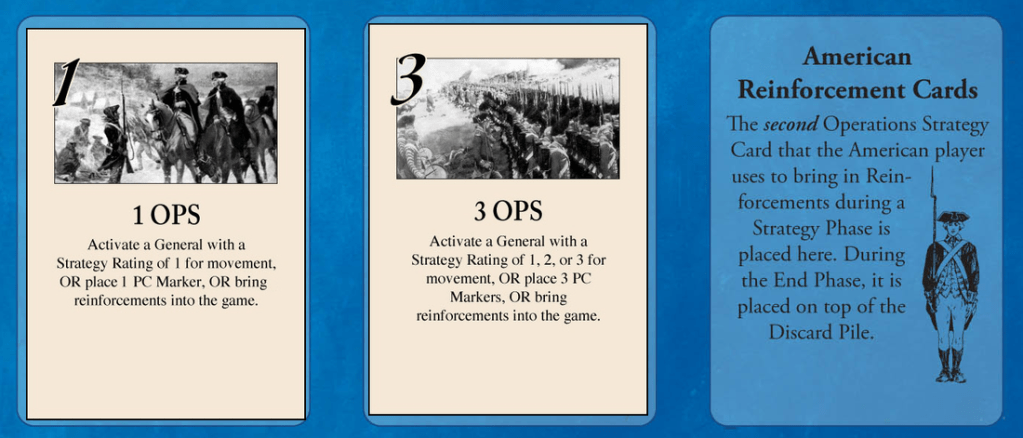
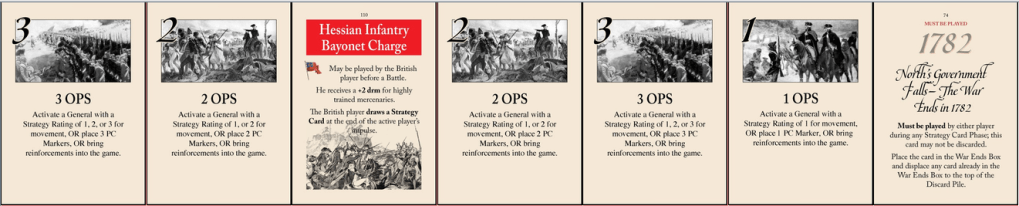
Bassett Town, Abingdon and Fort prince George each get a British control marker with the first 3 Ops. America is out of cards so we will do it one more time. The Brits play their second and final 3 Ops Card to place 3 more control tokens. This time it is Pittsburg, Oswego and Ticonderoga giving the British control over Virginia, South Carolina and New York States.

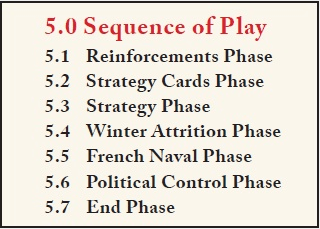
Both sides are out of strategy cards so that ends the Strategy Phase of Turn 1. The basic concepts for Washington’s War have now been covered. Anyone reading this should have a decent idea of how the game plays. I will wrap up turn 1 up in the next post and maybe offer some final thoughts on this interesting game.

Categories
Tabletop Board Game Washington's War

Card Driven Wargames Exploring Washington’s War / Part 2

In the last post, the British player used his one reinforcement for the turn to place General Cornwallis and 3 combat units in Norfolk Virginia. This created an open path to Philadelphia PA and the current home of the Continental Congress. Should a British combat unit enter Philly unmolested then it would disperse the Continental Congress. The Congress marker, if this occurred, would be placed on the turn track. While the Continental Congress maker is on the turn track, the American player is severely limited in the political actions they are allowed to take. This should be avoided by the American but is a worthy objective for the British.

Lets look at the map to get oriented:

An army can move though 4 adjacent spaces when activated. This means that Cornwallis is 2 moves away from Philadelphia should he pick this as an objective.

The American wants to provide Philadelphia a little protection against a possible Northern move by Cornwallis. In addition, getting control of New York is a priority for the Americans. The Yanks play a 1 OPs card to move Greene. Green moves three spaces from Newport to New York City.

I have circled Philly so you can see that Green is now within easy reach to protect the Continental Congress should Cornwallis advance North. Landing on New York puts Greene in position to establish American political control in a subsequent turn. We will discuss political control actions very shortly.

I have also circled General Greene’s strategy rating of 1 on his unit card. The strategy rating is the minimum OPs number that must be played to activate this general to move and fight. Greene can be activated on OPs 1-3. Since all Ops cards fall in the range of 1-3 General Greene can be activated on any OPs card in the deck. Howe by comparison needs a 3 OPs to activate. Since only a third of the OPs cards are 3OPs, Howe is much more difficult to get moving.

That ends the second card for the American and play goes back to Britain:

The British decide to play a 2OPs card to begin establishing bureaucratic control of their misbehaving colonies. The 2 OPs allows the British player to place political markers on the map. For each OPs point the British may place a control marker. Marker placement will depend on what is currently in the space. Lets break it down to make it easy to understand.

If the space is empty (no control markers or units) then the British can use 1OP to place a British control marker in a space adjacent to an existing British marker. That marker must have been present at the start of the turn. You may not daisy chain markers with a single card.

If the space contains an American control marker, then a British Army (General and at least 1 combat unit) must be present in the space to flip the existing marker from American to British.

Cornwallis uses 2 OPs to place British Control Markers in New Bern and Petersburg which were previously empty. This action represents the pacification of a region using arrests, offers of amnesty, seizure of armament stores, bribes and placing loyalists in control of government. Britain begins to solidify their control of the Southern Colonies.

Play returns to the Americans for another card. They are currently holding 5 Cards in their hand. They play:

The American player decides that two can play at politics and choses to play 3 OPs in New York and New Jersey for political control. Note that since General Greene is parked on the New York City space he can flip the existing British control marker. He also places new markers in New Brunswick and Long Island which were previously empty of markers. This puts the Americans on very solid footing in New York.

We return to the British player who is holding 5 cards. One of these cards is a special mandatory event card. It will need to be played before the end of the round and it is not particularly useful to the British player.

This card determines when the war ends. It gets played on the map in the “War Ends Box” to remind players of the current last year of the game. It can be replaced with other similar cards that may end up in either player’s hand. These cards make sure the players never really know when the game will end. This mechanic is useful to the designer t to prevent players from engaging in “gamey” actions. Knowing when the game will end allows a player to become unrealistically aggressive, for example, because they know there will be no consequences. The card is not useful, however, for the player who finds it in their hand. It’s a dead card that offers no immediate advantage.

Taking a “might as well get this over with” approach the British player plays the 1782 card to get it out of his hand.

We will resume play with the American’s 4th card in the next post.

Categories
Tabletop Board Game Washington's War

Card Driven Wargames Exploring Washington’s War / Part 1

The game begins with the Reinforcement Stage. Both player may at this time take any generals they might have in the “Captured Generals Box” and place them in the “Reinforcement Box.”

At the start of the game I have not yet succeeded at getting a general captured, so we can safely skip this step for now. Next, British players get to fill up their reinforcement box with combat units equal to the number found at the bottom of the turn record track.

The Vassal module has the British reinforcements already queued up in the numbered turn spaces on the turn record track. Note that British reinforcements are scheduled and limited. This has implications worth considering when playing the British. The American’s spend OPs to get reinforcements and are less limited in total number available. I will cover how American reinforcements work in more detail as opportunities to reinforce occur in the game. The British reinforcements are all set:

Like most war games we will be following the all-holy sequence of play. I find it useful when learning a game to look up each step on the Sequence of play as it occurs. It is easy to skip important steps in your first few playthroughs of a game. If you are not at least a little regimented on how you proceed through the turns, you are liable botch things.

Now that we have handled the reinforcement phase we can move on to playing strategy cards. Normally you deal cards in the “Strategy Card” Phase and then play them in the “Strategy Phase” which follows. I got excited and dealt out the cards early so we can skip to the Strategy phase and begin playing cards.

If the British have a campaign card, they can play that card to go first. If they do not have a campaign card or choose not to play one, then the Americans get the first play. The British did not get a campaign card in their draw for the first turn so the American’s get to play the first card.

The Yanks decide to reinforce General Nathanial Greene. He currently has only 2 Combat units and is located adjacent to British General Howe who is fully loaded with 5 British Regulars.

General Greene and his small army is a tempting target for a quick attack by Howe. I think bolstering this army makes sense. The 3OPs card is placed in the first Reinforcement card box on the map.

The American gets a combat unit for each OPs point on the card played for reinforcements. In this case it is a 3 Ops card so 3 combat units are placed with Greene. Note that all reinforcements for a given card must be placed in a single space. That space cannot contain a British combat unit or political control marker. Nathanial Green gets 3 combat units bringing him up to the maximum army size of 5 combat units.

The British are up next for their first card.

The American Armies are both just outside of Boston. This leaves the rest of the country without American armies. The Brits decide to start up a second army and deploy it in South in hopes of exploiting this lopsided deployment. The Brits spend 1OPs and place it in the British reinforcement box. Since any card will do, this is a good way for the British to make use of a lowly 1OPs card.

The British have used up their 1 reinforcement for the round but will get to place a general and 3 combat units. Cornwallis and 3 combat units land in Norfolk on the Virginia coast.

Deploying in any port without an American is an example of the British mobility advantage in this game. They can show up just about anywhere very quickly. The American player will have to consider carefully their next move. We will see what happens next in tomorrow’s blog post.

Categories
Tabletop Board Game Washington's War

Card Driven Wargames Exploring Washington’s War / Intro

I have been playing a lot of card based wargames lately. These games get called “CDGs” (Card Driven Games) by board gamers. The games use cards to determine what actions you can take. Typically the cards have both points and text. In most cases you can spend the points to take game actions or take the beneficial event described on the card. Rounds are typically based on a hand of cards. Several of these rounds represent time passing; after a set number of rounds the game ends.

I thought it would be fun to take a look at what is generally considered to be the first Card Driven Wargame. I should note there is debate in wargaming circles about which CDG was the first and more generally what constitutes a CDG. Debating these things does not sound interesting to me so I will leave that to others.

Washington’s War by Mark Herman is widely considered to be the first CDG. It is my understand that previous versions of this game were titled We the People. I am not sure why the name was changed but thought it might be useful to know the other name if you go looking for it. Washington’s War is currently in print and available for purchase.

Washington’s War does not have scenarios. Your only option is to play the campaign game. I think a full campaign playthrough would drag a bit in blog format so we will play at least one hand, perhaps more if it seems necessary to get the basics of the game. I will try to explain how the game plays as we go along. My primary goal with these posts is to present a feel for how the game is played and whether it is something that might be interesting to anyone reading the posts.

A quick primer on the cards is probably in order before we get started. Here is a typical OPS card; this example card is from the rule book.

The text on these OPS cards tells you exactly what you can spend the OPS points on. The OPS cards come in flavors of 1, 2 or 3. You will have a bunch of these OPS cards in your hand each turn.

Activating a general is how you move your armies about the map. A PC (political control) action is the process of changing political control of a space to your favor. Bringing reinforcements into the game is pretty self explanatory. I will discuss each of these action in more detail as they come up during the course of play.

The map is point to point:

Movement is through consecutive adjacent spaces that are connected by the grey lines on the map. General Howe and his 5 unit army in Boston is adjacent to both Greene in Newport and Washington in Lexington Concord. An activated general may move his army up to 4 spaces. British units may also move from port to port; ports are all considered adjacent for the British.

The player who controls the most states when the game expires is the winner. Control of a state is the player with the most PC markers in that state. There is an instant win victory condition for each side that ends the game instantly when one side is running away with it.

Before card play begins the Americans get to take the one-time Committee of Correspondence action. This allows the American to place 1 PC marker in each of the Thirteen States in the game. Then the British player gets For The King action which allows the placement of 3 British PC markers. These must be placed in a port or adjacent to an existing British PC marker. Normal play then begins. Here is the game map after the PC markers are placed. It is zoomed way out to fit the whole thing. Its going to be hard to read some details but the PC markers should be visible. The blue markers are American and the Red markers are British.

Let’s get started by looking at Each sides first hand of cards starting with the American Hand:

The American’s have 14 OPs points and 1 British event card. With 4 3OPs cards the American should be happy with this hand. Next the British hand:

The British have 11 OPs points in total, 1 combat card and 1 “end of turn” event card. The Americans will have more OPs for the first turn but the combat card once used allows a card draw. This may further balance the total points. We will discuss the event cards in more detail when they are played. That should set things up nicely for the first game few cards in the next post.

Categories
Nevsky Strategy Gaming Tabletop Board Game

Exploring Nevsky: A Board Game of Medieval Strategy / Part 10 (complete)

Play resumes with the Russian player draw for their command deck. Since Gavrilo is the only remaining Russian Lord, there is no surprise to see his command card drawn here.

Gavrilo has little choice but to find a way to score VP. To that end, He marches twice to Tolowa, then Rositten where he uses his last command to ravage. This gives him provender and loot which he uses to feed his troops. The move gives him 1/2 VP and with that the game is tied at 5VP per side.

Hermann is too far away to engage Gavrilo. He needs to be in Russ to ravage and so must move East and close the distance to Gavrilo. His plan is to close and limit the Russian’s options. He elects to march 3 times Southeast to Fellin, Southeast to Odenpah and then Southeast to Kirrumpah.

With just 1 cart Hermann can only bring 1 provender on the trackway. He requires 2 provender to feed his troops so for the first time his vassals go hungry. This moves his service marker 1 space to the left going from the turn 4 box to the turn 3 box. Not enough to disband him this turn. One more missed meal, however, and Hermann’s troops will bail.

Hermann’s move puts Gavrilo in a pickle. He is objectively weaker than Hermann in battle. While he is tougher than Vladislav, Gavrilo’s force has too many light horses and militia units. Hermann’s force is primarily Knights and Men-at-Arms. It would be no contest and losing to Hermann would seal the victory for the Teutons. Gavrilo will have the last card and so decides to head for the safety of Pskov.

Gavrilo uses 3 march commands, to Lettgallia, then Izborsk and finally Pskov. Safe behind the walls Gavrilo waits on Hermann’s last card. Gavrilo too is without provender to feed his hungry troops so his marker joins Hermann’s in the 3rd turn box.

Hermann uses his third and last command card to march to Pskov and lay siege to the fortress. It takes 2 march commands to get there and with his last command Hermann ravages the region surrounding Pskov for the loot and provender to feed his hungry troops. He also to gains a critical 1/2 VP. Teutons now have 5 1/2 VP to Russia’s 5.

Gavrilo is trapped behind the tall walls of Pskov and the Russian’s trail by 1/2 VP. Gavrilo has no choice but to sally forth and attempt to win an uneven field battle. The game comes down to a battle below the walls of Pskov. This time we will use the Lord’s mats facing eachother to track our battle:

Here is an outline (Handy player aid) as a reminder of the battle procedure:

Archery:
Herman is the defender so will go first with archery, Gavrilo has no archers. The Balistarii card is again a critical piece of kit. Gavrilo must survive 2 Hits in the archery phase. Gavrilo uses his militia to absorb the armor piercing crossbow bolts. He rolls a 1, 2. One of the bolts routes a militia but the another militia evades the bolts.

Cavalry:
The defenders are first again. Hermann’s Knights and Sergeant do 7 Hits in the charge. Gavrilo will use his militia again to absorb the hits. It takes 4 of the 7 hits (5, 1, 2, 5) to route the remaining 3 militia units. There are 3 remaining hits, so Gavrilo decides to use his 2 Men-at-Arms to attempt to tank the rest of the damage. The next 3 rolls (3, 6, 4) are enough to route both Men-at-Arms units.

Gavrilo has a Knight and light horse to counter. This is 2 1/2 hits which is rounded to 3. Hermann decides to tank the hits with his Knights. The rolls go poorly for Herman (5, 5, 6) and just like that 3 Knights route granting some much needed hope to Gavrilo.

Infantry:
Hermann’s Men-at-arms will do 4 hits to Gavrilo who has only 1 Knight and 2 light horse remaining. Gavrilo will attempt to tank the hits with his sole Knight. The first roll is a 6 and the Knight routes immediately, so much for hope. The next two rolls (4, 2) route the remaining unarmored light cavalry and that ends the battle.

Gavrilo’s defeat on the last turn of the game gives the Teuton player 1 VP and the overall victory in a tightly played game.

I will end the post here but will spend the next blog post ruminating on this interesting game.

Categories
Nevsky Strategy Gaming Tabletop Board Game

Exploring Nevsky: A Board Game of Medieval Strategy / Part 9

A lot comes down to this very next command card. There are 2 potential lords Hermann could go after, Vladislav in the North or Gavrilo in the South. Since I am playing solo, the Russians would know (because I know) the Teutonic plans. To avoid this issue I randomly selected the order of the Russian command cards by rolling the dice. I think this fair as the Russian player would not know what the Teuton is planning. As before, we start the campaign phase with by drawing a command card from the Teuton player’s deck. There is no surprise here, as Hermann is the only Teuton lord on the map:

Hermann has 3 commands to work with and Vladislav is the closest enemy, only 2 spaces away. Hermann will use his first command to Supply. This is a command we have not yet used during this game.

Hermann has 2 nearby supply sources and 2 boats. He can use the supply command to gain up to 2 provender, 1 from each supply source. He is at his home location Dorpat which is one of his supply sources (it shares his heraldry) therefore no transportation is needed to gain the first provender. He has a second adjacent supply source at Odenpah. This is connected by a waterway so Hermann can use boats to transport the second provender. Herman gains the needed 2 provender with just 1 command. He uses his last 2 commands to march and intercept Vladislav at Jerwen which triggers combat.

When intercepted lords have the option of Avoiding Battle. Avoiding battle allows a lord to slip away to an adjacent location with a few restrictions:

  • They cannot avoid in the direction the attacking lord arrived from.
  • They cannot avoid battle into an enemy stronghold or another enemy lord.
  • They must be unladen when avoiding battle so loot and any provender that causes the laden condition will be left behind.

Avoiding battle also tags the fleeing lord with a moved/fought marker requiring that lord to feed his troops. In Vladislav’s case he has been feeding his troops from the proceeds of his ravaging so it without loot. Should he avoid battle he will be subject to immediate disbanding as his service marker is just 1 box forward in the next turn 3. Disbanding will grant the Teuton player 1 VP so it would be no different than losing a battle. Battles are more fun so let’s do that instead.

To battle you can slide the opposing lord’s mats together or place the unit pieces on the battle board. I have set up the battle board here with Hermann as the attacker and Vladislav on defense:

In the case of multiple lords on one side, any subsequent lord fills in the flanks of the battle board. This is a one-on-one battle so there are no flanks.

Next, lords can play battle events and Hermann has Field Organ to play. Marsh is only playable on defense so he will have to continue to hold that event:

Each side now has the opportunity to concede the battle after one round. This has the advantage of potentially limiting the losses following a battle. Vladislav is outgunned. In a full game conceding would be the proper play but in this case Vladislav will have to stick it out. He can’t feed his troops and will have to disband if he loses so best to go for the win.

Defender gets the initiative in all battle rounds. Battles start with archery first. Vladislav does not have archers in his army. Hermann, however, levied the Arts of War card Balistarii that gives all of his Men-at-Arms crossbows. Hits from crossbows enjoy a -2 to the target’s armor.

Herman has 4 Men-at-Arms units who all fire their crossbows. Here are the combat stats for all of the units so you can follow along:

The 3rd column shows that Men-at-Arms with crossbows do 1/2 hit each. 4 crossbows inflict 2 hits on Vladislav’s units. These hits get a -2 to the defender’s armor rating.

The Russian player has to decide which units take the 2 hits. He has 1 Sergeant, 1 Light horse, 2 Men-at-Arms and 1 Militia. The -2 armor on these hits will negate the benefits of his armored units so the Russian player choses instead to suffer the crossbow hits on his unarmored units. The light horse and militia will take the hits. As detailed in the armor chart (4th column) above these units are unarmored and must roll a 1 to avoid being routed. The Russians roll 1, 6. The light horse evades the damage but the militia routes. The Russian is down to 4 units.

Next is the melee step starting with horse units. Again defenders go first. Vladislav has a light horse and a sergeant. Light horses do 1/2 hit (rounded up) and sergeants do 1 hit in melee. Hermann will take the hits on his Men-at-Arms units. He rolls 4, 3 one passes and one is too high (needed a 1-3) so 1 Men-at-Arms unit routes.

Hermann turn to strike with horse units. He has 4 mounted units. 2 Knights (2 hits each) and 2 Sergeants (1 Hit each) + he has the Field Organ Arts-of-War card that adds +1 hits for each of his Knights and Sergeant units on round 1. This totals out to a whopping 10 hits from Hermann’s mounted units. The Russian will start by taking the hits on his Sergeant Unit. The rolls are 3, then 5. The 5 is too high and the Sergeant is routed, 8 hits to go. The Russian will start taking the hits on his 2 Men-at-Arms units. The dice come up 3, 4, 1, and 6. The 4 and 6 are too high and the Men-at-Arms units both route. The light horse is the last Russian unit left with 4 hits to go. The Russian will need a miracle to survive. The rolls are 1, 1 and 3. It is the second to last hit that routes the resilient Russian light horse. The battle ends with a Teutonic victory.

Lord Vladislav is permanently removed from the game after his defeat. For his victory Lord Hermann gets 1 VP. Hermann also gets all of Vladislav’s assets. This amounts to a single cart.

Lord Herman now gets to see if his routed unit can be recovered. To succeed in recovering a routed unit you must roll under the units armor rating. If successful the unit returns to service if not, then it is permanently routed and removed from the game. Hermann has 1 routed Man-at-Arms unit and he successfully rolls a 3 returning the Man-at-Arms back to service.

The Teutons currently have 5 VP and the Russians 4 1/2 VP. We will complete our Nevsky exploration with my next post.

Categories
Nevsky Strategy Gaming Tabletop Board Game

Exploring Nevsky: A Board Game of Medieval Strategy / Part 8

The new turn begins with pulling 2 cards from the arts of war deck. On the first turn we pulled the cards and used the capabilities on the bottom of the card. For all the remaining turns we now look only at the top of the card and execute the event text.

Let’s look at the two events the Teuton Lords drew:

As cool as Halbbruder and Balistarii are we ignore the capabilities this turn and look only at the top of the cards. Both cards are combat related, they are held until a battle and can be played to kick up the spice at a critical time. Field Organ will make Teuton Knights and Sergeants much tougher on round 1 of a battle. Marsh will hamper the effectiveness of the Russian Cavalry for a couple of rounds. The Teutons have some potent options up their sleeve should there be a battle during turn 2.

Now lets see what the fates provided for the Russian player:

Valdemar causes Danish unrest. It seems Knud & Abel will be going home early to deal with Royal politics. This card is implemented immediately and is a significant blow to the Teuton Lords if they can’t find a way to extend Knud & Abel. The Russians shift Knud & Able 1 turn box to the left. This puts their service marker in the current turn and subjects them to immediate disbanding.

The Mindaugas event allows the Russian to add a free Ravaged Marker to Livonia territory. We add it to Tolowa bringing the Teuton VP lead down to only 1/2 point. It is a close game going into the final turn. Now that both events have been implemented the cards are sent to the discard pile.

With the Arts of War phase completed for turn 2 we move on to the Pay step of the Levy Phase. This is where we can spend loot or coin to extend a lord’s service. There are 2 lords on the map whose service markers are in the current turn box. Yaroslav and Kund & Abel are both going to disband unless the Teuton can pay them. Neither has loot or coin so unfortunately for the Teuton player the service markers remain in the 2nd turn box of the calendar.

The next step in the Levy Phase is disband. The Teutons must remove both lords from the game map whose service markers are in the current turn box and place their cylinders forward spaces equal to their service ratings. This puts Yaroslav 2 spaces forward and 3 for Knud & Abel. Since the scenario ends after this turn, they are essentially gone. Hermann alone must to try and win the game. The scenario rules state that if an enemy lord is disbanded or removed this grants the player 1 VP. The Russians get a full VP and take the lead by 1/2 VP. Play moves on the the Muster portion of the Levy Phase.

Hermann has a Lordship rating of 3. This gives him 3 muster actions. He is now the only Teuton Lord on the map. He has Russian Lords in Teuton lands raiding both North and South.

Hermann has the option of using a muster action to attempt to bring another lord onto the map. Rudolf von Kassel’s cylinder has been on the calendar in the Turn 1 box since the beginning of the game. Hermann could attempt to muster him to help, this would cost a muster action and there is no guarantee he will muster. The other alternative for Hermann is to gear up and attempt to take out one of the Russian Lords. This would prevent continued ravaging from that lord and grant Hermann a VP.

Vladislav is in range and vulnerable to battle. Hermann just loaded up with useful combat event cards during the Arts of War draw phase and we haven’t yet show a battle. I think the stars are aligned and indicate a clash of arms. Hermann levies a second Vassal adding 1 Knight and 1 Men-at-arms unit to his mat. He then searches the Arts of War deck and adds the Balistrarii capability. Finally, since he is over 6 units he adds a boat transport so he can carry the necessary provender.

The additional troops and Arts of War card make Hermann formidable. He is the only lord allowed to muster. The Russian Lords are not in friendly territory and so must make do with their current loadouts. As a result the very quick Levy Phase comes to an end and we move on to the Campaign Phase of Turn 2. We will have the first moves in the next post. The Russian and Teutons will build command decks for the next round. I think the game will come down to a battle triggered with the very first command card of the turn. Can Vladislav escape destruction? We shall see.

Categories
Nevsky Strategy Gaming Tabletop Board Game

Exploring Nevsky: A Board Game of Medieval Strategy / Part 7

We pick up the gameplay following Knud & Able’s continued ravaging of the Northern coast. Gavrilo has left the safe confines of Pskov to begin raiding the Teutonic regions to the west. The Russians draw the next card:

Gavrilo’s final command card is drawn. Let’s take a look at his situation on the map and discuss his options:

Gavrilo Has 2 commands and the Druzhina Arts of War card for a bonus of +1 command which gives him a total of 3 commands. It is tempting to move Gavrilo back to Izborsk so that he will be in a friendly location for the imminent Levy Phase. If he stays in Teuton lands he will not be able to participate in the upcoming Levy. This would be the smart play, I think, in a longer game but as it stand there is only 1 more turn in the game. I think Gavrilo must press on and try to keep the VPs close. He decides to move further West.

An important consideration is Yaroslav. He is on the map and could potentially take advantage of a levy to make him a more formidable opponent. He is also just a few hops up in ODenpah. Let’s look a little closer at Yaroslav’s situation.

Note Yaroslav’s service marker is on Turn 2. This means he will end his service and disband as soon as this turn is over unless he can find a way to extend service. He does not currently have coins which would allow him to move his marker 1 space to the right and extend to turn 3. If, however, the Teutons have a command card in the deck this turn for Yaroslav, then he could use it to tax and then extend service in the levy phase. The Teutons have not mobilized him for the entire turn so he most likely does not have a card in the deck.

The Russians, however, cannot be certain and so must be wary of Yaroslav potentially activating.

Gavrilo moves West to Adsel, then continues West to Wenden where he ravages gaining 1 loot and 1 provender. This takes 3 commands and yields enough booty to feed his troops. The Russians close in on the Teuton lead by gaining another 1/2 VP. Play switches back to the Teuton Lords for their final card of the turn.

It turns out Hermann is the last Teuton card. It’s been a while since we have seen Hermann. Let’s take a look at where we left him:

Hermann levied boats for transport so we need to keep in mind that he cannot carry anything with him unless he travels by waterway. It would also be useful to take advantage of the imminent levy phase. It looks like we can get one more ravage in and still make it to friendly territory.

Hermann will head West to Gdov, ravage and then head North following the coast of Peipus all the way around and back to his home seat at Dorpat completing a grand circuit.

Following the coast makes Gdov and Dorpat adjacent by waterway so Hermann took carried the provender he looted at Gdov with him to feed his troops. He ends his turn where he started back at Dorpat where he will get to take advantage of the upcoming levy phase.

The Russians get Vladislav’s last card. We last left him busily raiding the Northern Teutonic lands. He will continue to ravage the North. He moves west to Wesenberg castle and raids the countryside collecting provender and loot and then moves off to the Southwest arriving in Jerwin with his final command.

Vladislav ends his activation in Jerwin and that ends the campaigning season. There is a few administrative steps that occur before the next turn starts. Both sides must deal with wastage. Any lord with more than 1 type of assest must discard 1 asset.

Knud and Abel have 4 ships so they must discard 1 ship. Gavrilo has 2 Arts of War cards so will get rid of Luchniki and Hermann has 2 boats and discards 1 leaving him with just 1 boat. The trials of a campaign season are hard on equipment and transportation assets.

Since we have not yet sieged and stormed a keep or had a battle we will endeavor to set one up for the next turn which we will start in my next post.

Categories
Nevsky Strategy Gaming Tabletop Board Game

Exploring Nevsky: A Board Game of Medieval Strategy / Part 6

Back to Russia for their 4th strategy card. The Russians now trail by 1VP. It is time for them to get more aggressive and take some risks. The Russians draw the Gavrilo command card again:

Gavrilo is going to have to leave the safety of Pskov and risk Hermann heading South towards Pskov. Staying put would protect Pskov from attack but does not earn any VP for the Russians and the Teutons have pulled out to a concerning lead. Gavrilo must head West. He has only 2 commands but the Arts of War card Druzhina grants him a bonus action giving him 3 commands to work with this turn.

Gavrilo will head due west into Teutonic lands leaving the safety of Pskov behind. First command will be to march to Isborsk, 2nd command to Kirrumpah and then the third command will be used to ravage Kirrumpah.

The ravage command grants 1 provender in empty regions and in any other space you get loot as well. Kirrumpah is a fortunately a town so in addition to the provender he gets loot. Loot works like just like provender except it is alive and can move slowly on its own. Loot is essentially livestock.

You can use both loot and livestock it to feed your army. This will allow Gavrilo to spend the just acquired loot and provender to remove the moved fought marker and avoid the consequences of starving troops. The ravage also grants 1/2 VP for Russia and cuts the Teuton lead to just 1/2 VP. Pskov is left behind, vulnerable with just its inherent garrison.

Gavrilo’s move puts him adjacent to Odenpah and the location of the Teutonic lord Yaroslav. Given that both Knud & Abel and Hermann have been active the entire turn it is a good bet that the Teutons are not planning on activating him Yaroslav.

Even if they put a Yaroslav’s command cards in their command deck he would not likely present a combat challenge to Gavrilo. He simply does not have enough troops and would very likely lose a battle should he try to attack.

The Teutons are now up for their 5th command card. They pull the 3rd and final command card for Knud & Abel.

Knud & Abel are going to continue to ravage Russian lands. With command 1 they move Northwest to Koporye, a Russian fort. The fort is immediately placed under siege, since there is no enemy lord present, the fort’s intrinsic garrison is doing the defending. The first siege marker is automatically placed when any lord arrives at an undefended enemy fortification.

Knud & Abel used their Arts of War capability to Ravage the fort at Kaibolovo located in the adjacent area to the Southwest. They then use their final action to Ravage Koporye in their current location. These actions total 2 VP, 2 Provender and 2 Loot from the two ravaged regions. Knud & Abel spend 2 provender to feed leaving them with 2 loot on hand. The Teuton side takes a 1 and 1/2 VP lead over the Russians.

Knud & Able have no more command cards in the deck so they are done for the turn. There is 1 Teuton card and 2 Russian cards left to play for turn 1. We will complete turn 1 in our next post and see how the Russians respond.

Categories
Nevsky Strategy Gaming Tabletop Board Game

Exploring Nevsky: A Board Game of Medieval Strategy / Part 5

The first turn card play continues with the Russian player. The Russians pull Lord Gavrilo from the command deck. Teutonic lords did not start with the usual strategy of immediately sieging Pskov so Gavrilo has been on the side lines thus far. Let’s take a quick look him:

Not knowing that the crafty Hermann was going to try a ravage strategy the Russian player absolutely loaded Gavrilo up with assets during the Arts of War and Levy phases. Gavrilo was given both Arts of War cards and he also mustered all three of his available vassals. This is all because Gavrilo sits in Pskov the usual early target of the crusaders. This has made Pskov difficult to take but has created problems now that the Teutons have chosen a more mobile strategy.

You can see why Pskov is a tasty target. It is close to the Teuton’s starting locations and Gavrilo is generally weaker than his Teuton opponents. It is very tempting as the Teutons to send Hermann & Gavrilo directly to Pskov for a siege and storm. This is why Gavrilo loaded up. The problem is what to do with him now that he is not likely to be defending his keep.

Gavrilo has 2 commands at his disposal. He is loaded for war with 9 units mustered. This means that moving and fighting costs him 2 provender. Gavrilo also mustered vassals instead of transports so he cannot take any provender when he moves. In short, early logistical decisions have hampered Gavrilo’s mobility.

We also need to consider the tactical situation. Gavrilo is between Hermann in the North and the yet unmentioned Lord Yaroslav in the West. Hermann is only 2 marches away from Pkov and has 1 card remaining. Should Gavrilo leave Pskov, Hermann could put it under siege and force Gavrilo to fight outside the Fortress. This would not be good. Worse when you consider that Yaroslav also nearby.

Yaroslav is not quite as yoked as Gavrilo but is probably strong enough to weaken Gavrilo enough for Hermann to complete the job. Here is Yaroslav’s mat for comparison.

It is both frustrating and boring but I think the best decision is for Gavrilo to stay put and see if Hermann moves out of range. The VP are still even so it is not yet time for rash decisions. Instead of sallying out Yaroslav can use a tax command.

Taxing will take Gavrilo’s entire card but gives him 1 coin token which can be used to extend the service of a Lord by pushing the service marker on the calendar to the right 1 space.

The Russians will be hoping to see Hermann’s card drawn. Since there are only 2 lords on the Russians side we know Yaroslav still has 2 command cards in the deck. Knowing Hermann is done for the turn would allow Yaroslav some much desired operational freedom. For now he is stuck holding Pskov.

Hermann’s card is not pulled. Instead, play returns to the Northern coast with Lords Knud & Abel.

Knud & Able have their own concerns. They have an large army (7 units) that requires 2 provender to feed and they only have 2 commands per card. They have to get a lot done with just 2 commands. The raiding Arts of War card will help with this situation. Here is Knud & Able’s mat:

The Raiders Arts of War card will allow Knud & Able a free ravage action as long as it is to an adjacent location connected by trackway. The order of operation for this turn is important. They will need to move first then ravage since they do they did not levy cart transportation and can’t take provender.

For command 1 Knud & Abel march to Vod. They use their raider Arts of War card to ravage Ingria which is adjacent by trackway. The ravage grants 1/2 VP and a Provender. Then with command 2 they ravage Vod where they are located for the 2nd Provender giving them a total of 2. This is enough to feed their troops and remove the moved fought marker. The 2nd ravage also earns another 1/2 VP for the Teutons.

That ends Knud & Ables 2nd command card. The score stands at 2 1/2 points for the Teutons and 1 1/2 points for the Russians. Gavrilo is going to need to start taking some risks or the game will be over.

We will take up the action with the Russians in the next post.