Categories
Nevsky Strategy Gaming Tabletop Board Game

Exploring Nevsky: A Board Game of Medieval Strategy / Part 7

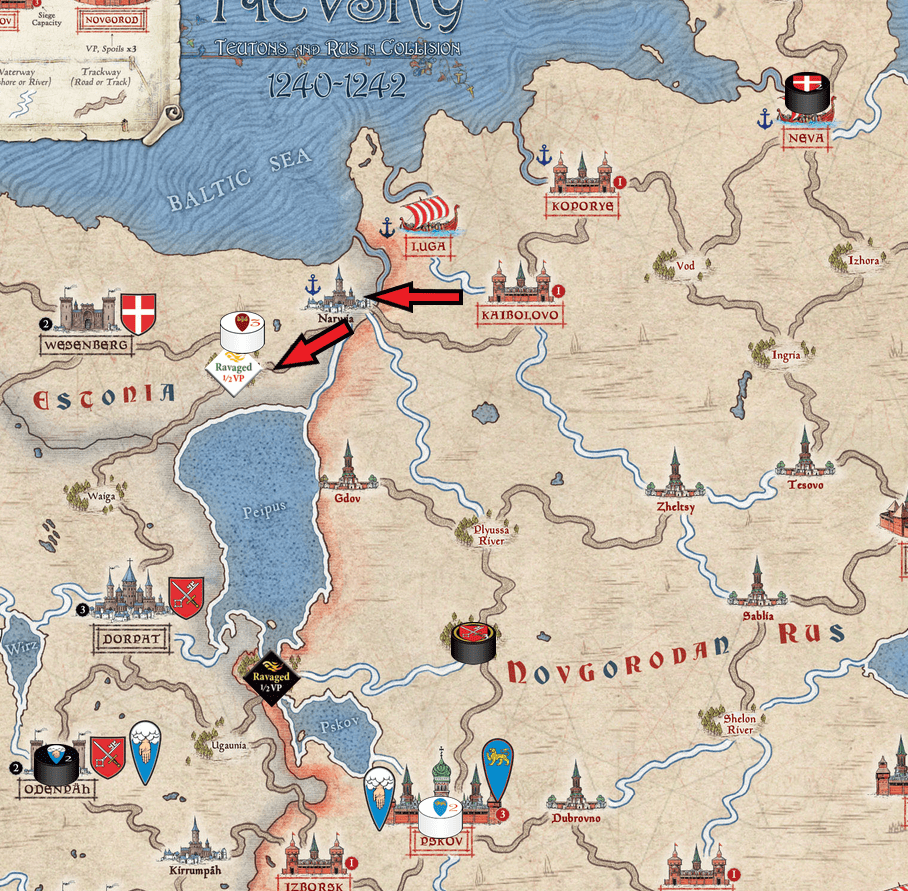
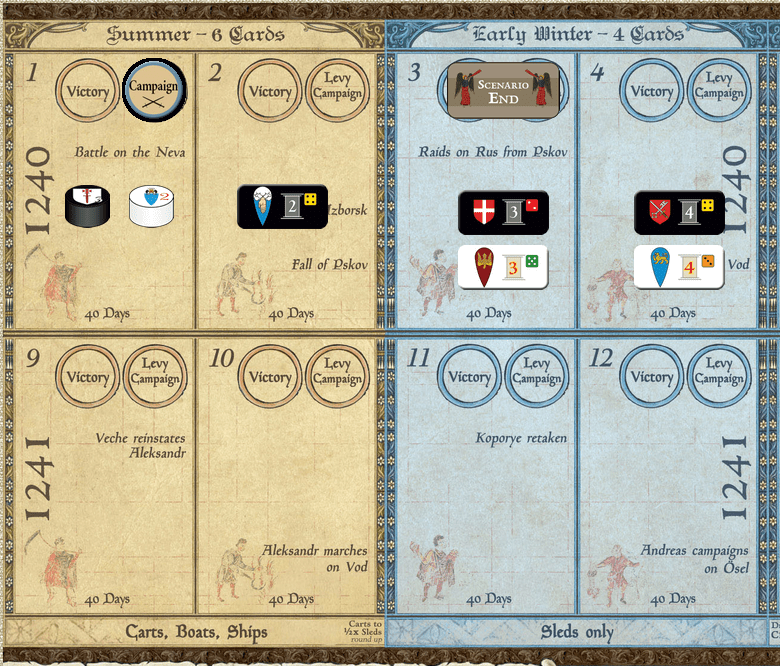
We pick up the gameplay following Knud & Able’s continued ravaging of the Northern coast. Gavrilo has left the safe confines of Pskov to begin raiding the Teutonic regions to the west. The Russians draw the next card:

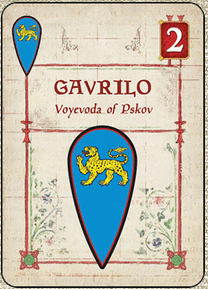
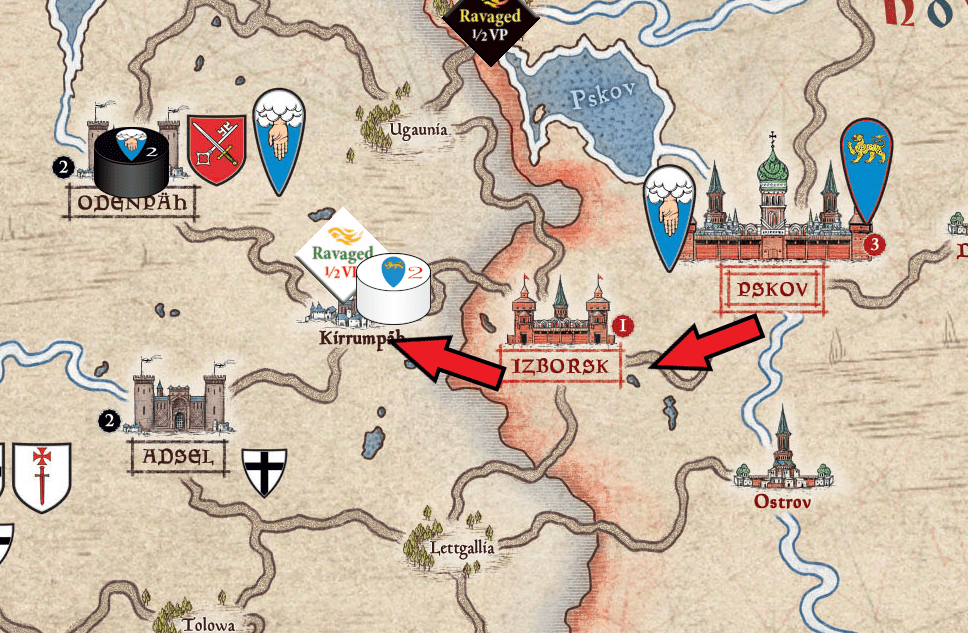
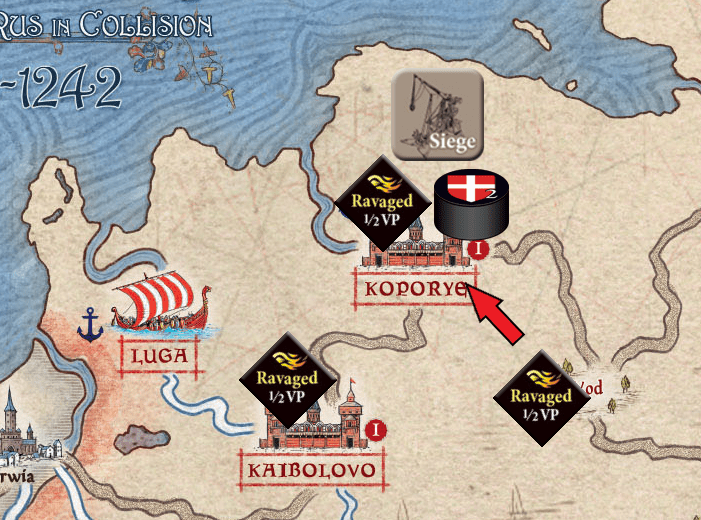
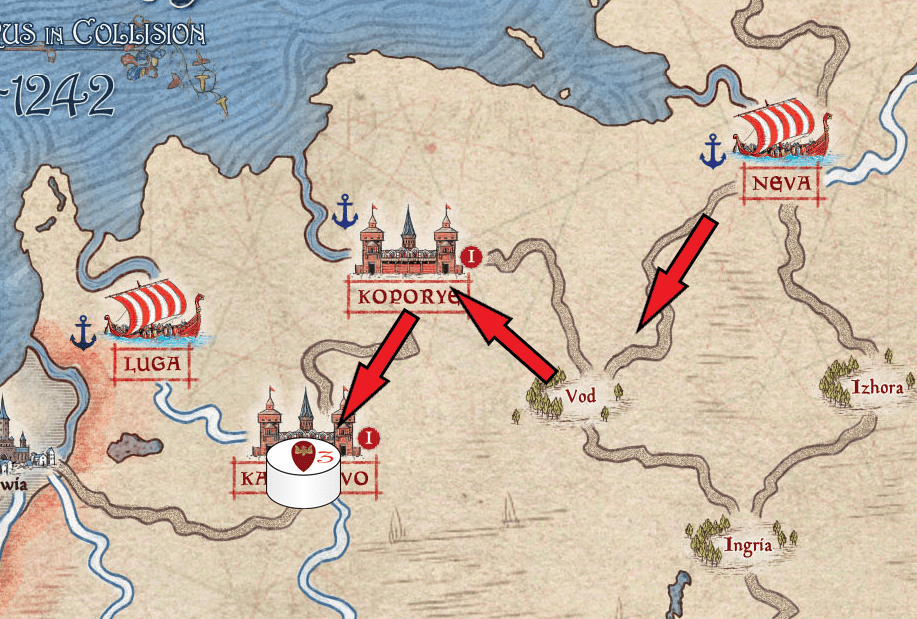
Gavrilo’s final command card is drawn. Let’s take a look at his situation on the map and discuss his options:

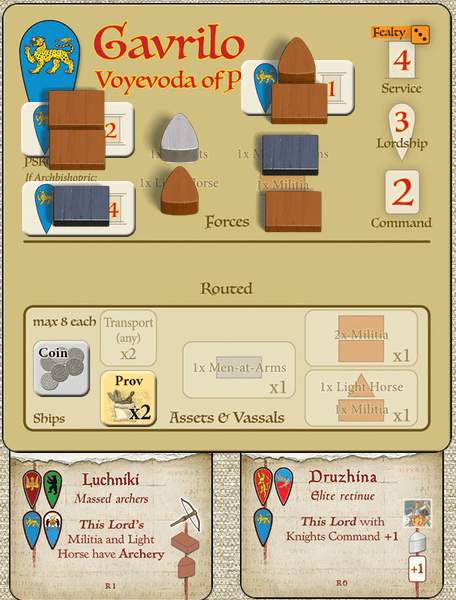
Gavrilo Has 2 commands and the Druzhina Arts of War card for a bonus of +1 command which gives him a total of 3 commands. It is tempting to move Gavrilo back to Izborsk so that he will be in a friendly location for the imminent Levy Phase. If he stays in Teuton lands he will not be able to participate in the upcoming Levy. This would be the smart play, I think, in a longer game but as it stand there is only 1 more turn in the game. I think Gavrilo must press on and try to keep the VPs close. He decides to move further West.

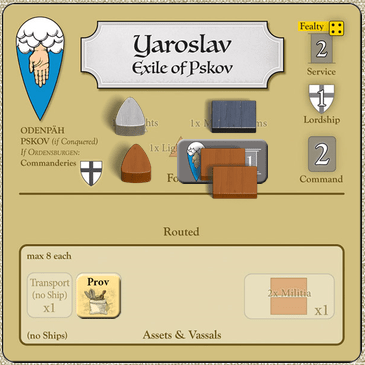
An important consideration is Yaroslav. He is on the map and could potentially take advantage of a levy to make him a more formidable opponent. He is also just a few hops up in ODenpah. Let’s look a little closer at Yaroslav’s situation.

Note Yaroslav’s service marker is on Turn 2. This means he will end his service and disband as soon as this turn is over unless he can find a way to extend service. He does not currently have coins which would allow him to move his marker 1 space to the right and extend to turn 3. If, however, the Teutons have a command card in the deck this turn for Yaroslav, then he could use it to tax and then extend service in the levy phase. The Teutons have not mobilized him for the entire turn so he most likely does not have a card in the deck.

The Russians, however, cannot be certain and so must be wary of Yaroslav potentially activating.

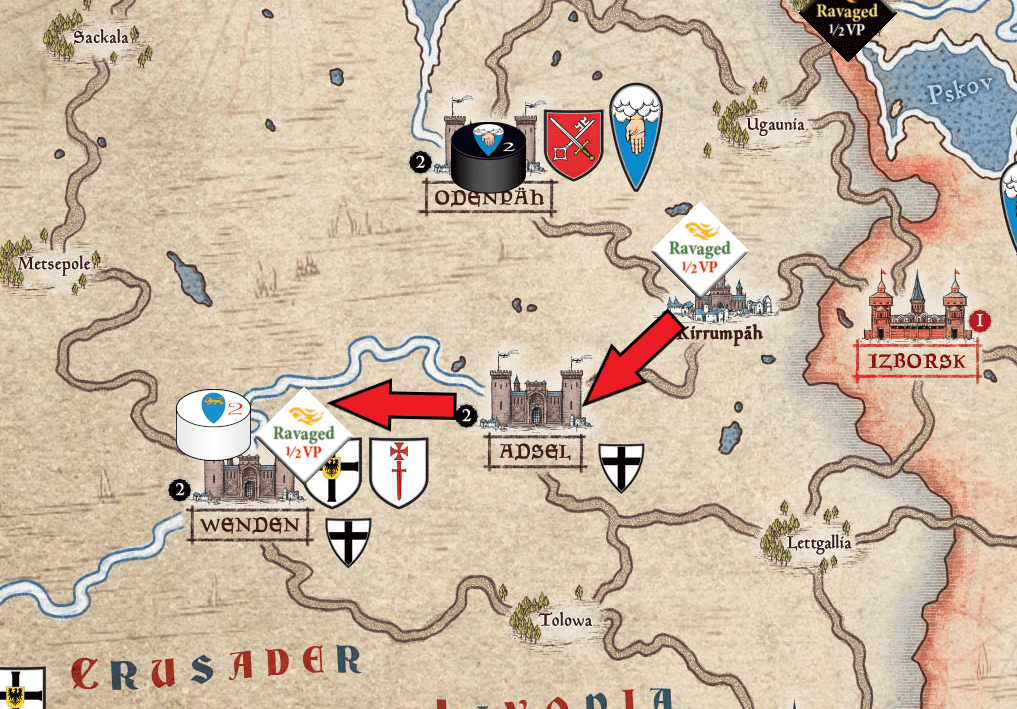
Gavrilo moves West to Adsel, then continues West to Wenden where he ravages gaining 1 loot and 1 provender. This takes 3 commands and yields enough booty to feed his troops. The Russians close in on the Teuton lead by gaining another 1/2 VP. Play switches back to the Teuton Lords for their final card of the turn.

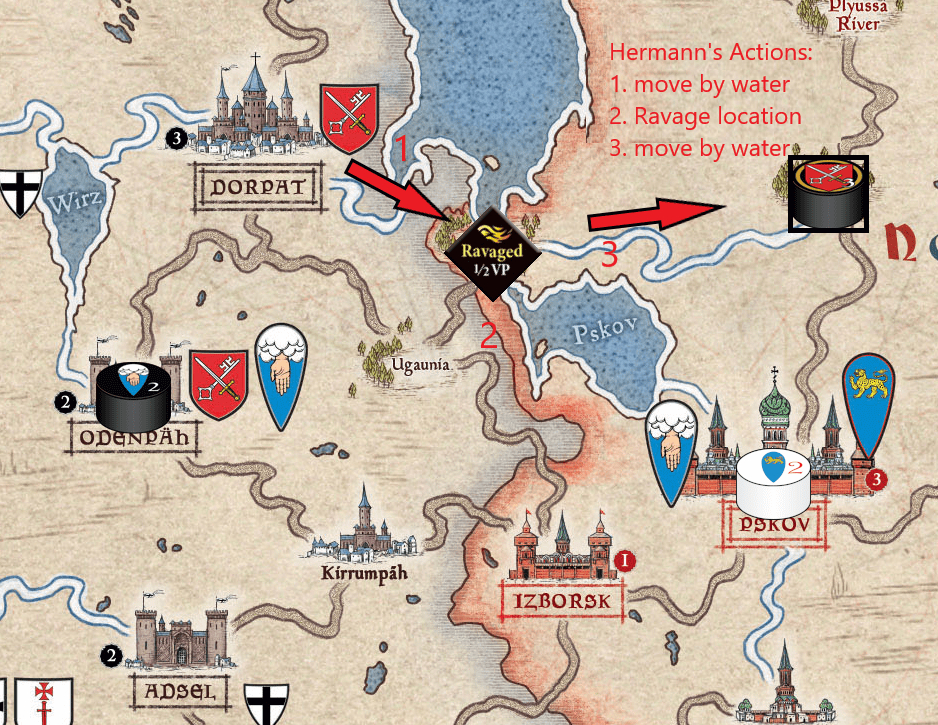
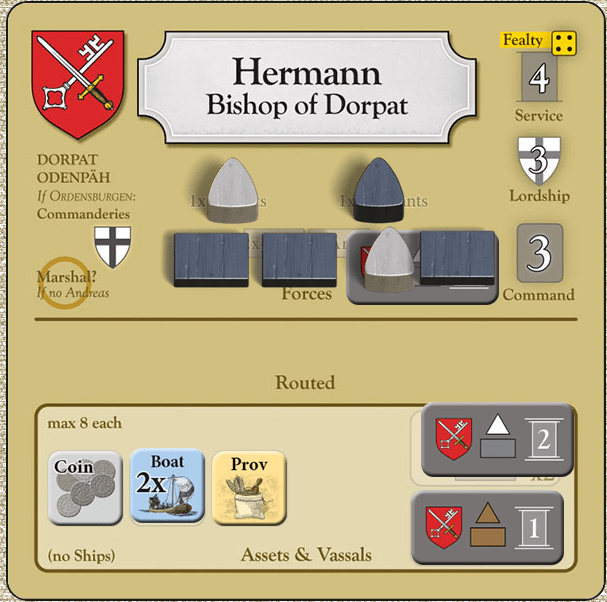
It turns out Hermann is the last Teuton card. It’s been a while since we have seen Hermann. Let’s take a look at where we left him:

Hermann levied boats for transport so we need to keep in mind that he cannot carry anything with him unless he travels by waterway. It would also be useful to take advantage of the imminent levy phase. It looks like we can get one more ravage in and still make it to friendly territory.

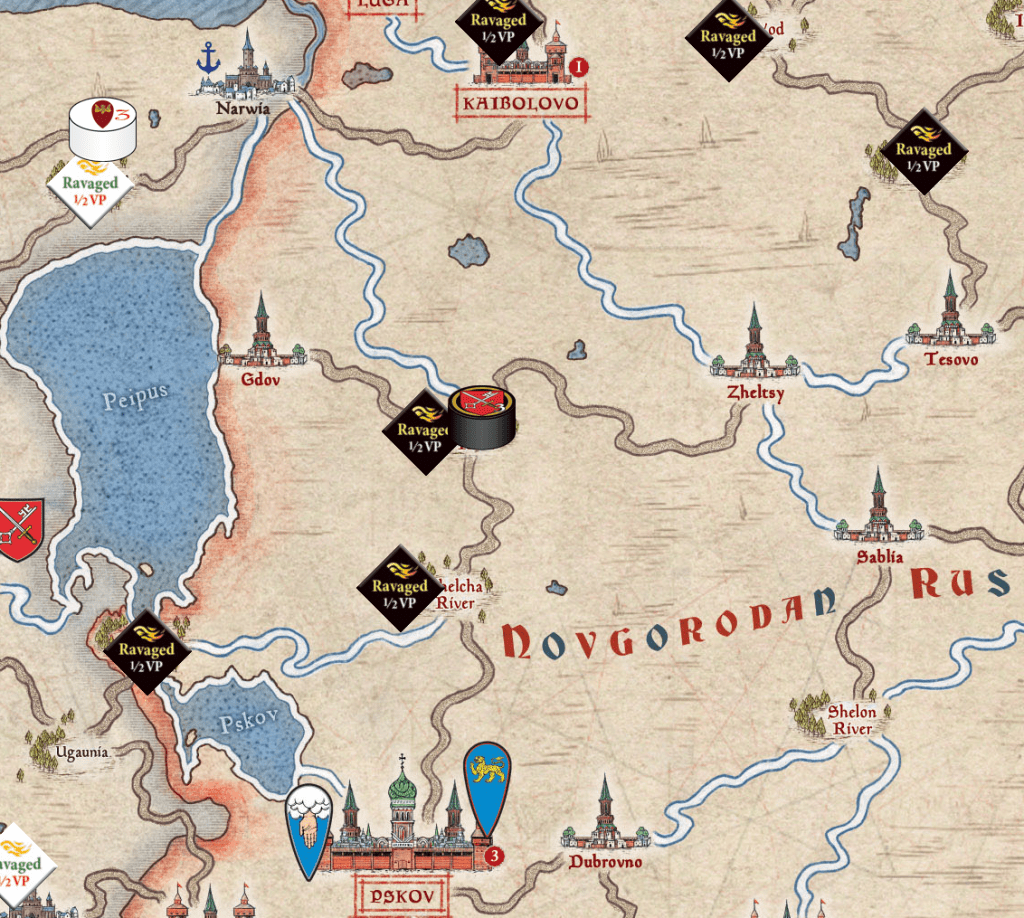
Hermann will head West to Gdov, ravage and then head North following the coast of Peipus all the way around and back to his home seat at Dorpat completing a grand circuit.

Following the coast makes Gdov and Dorpat adjacent by waterway so Hermann took carried the provender he looted at Gdov with him to feed his troops. He ends his turn where he started back at Dorpat where he will get to take advantage of the upcoming levy phase.

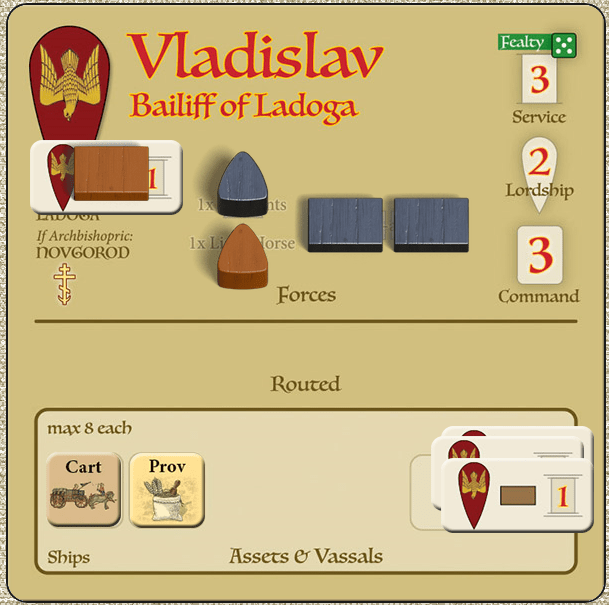
The Russians get Vladislav’s last card. We last left him busily raiding the Northern Teutonic lands. He will continue to ravage the North. He moves west to Wesenberg castle and raids the countryside collecting provender and loot and then moves off to the Southwest arriving in Jerwin with his final command.

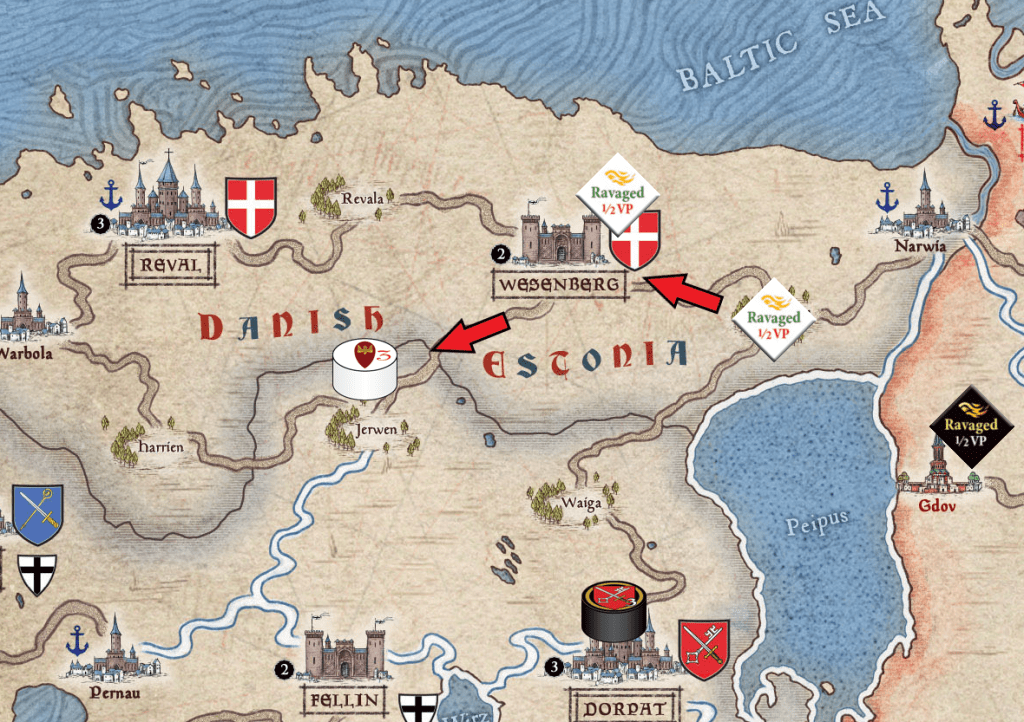
Vladislav ends his activation in Jerwin and that ends the campaigning season. There is a few administrative steps that occur before the next turn starts. Both sides must deal with wastage. Any lord with more than 1 type of assest must discard 1 asset.

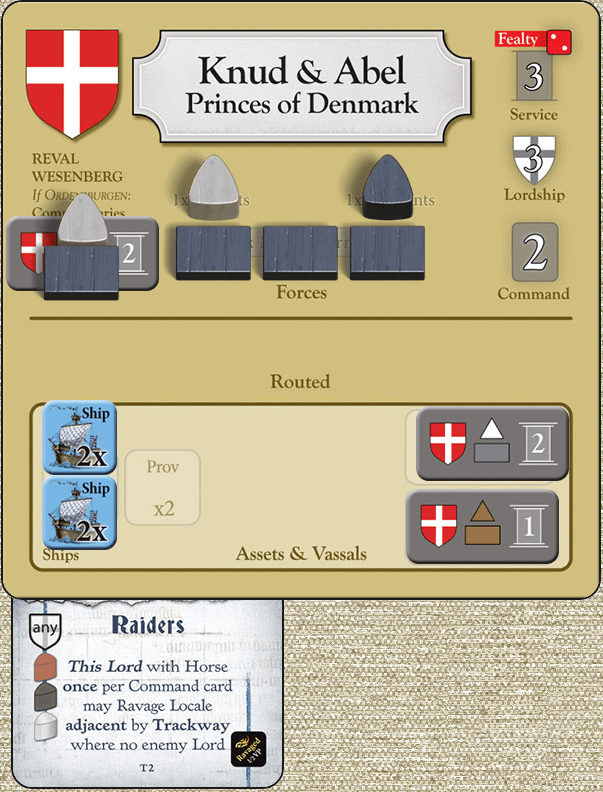
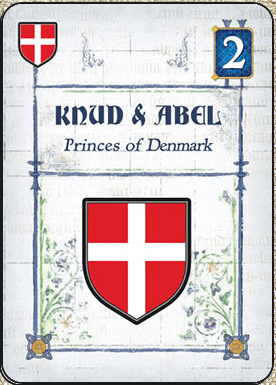
Knud and Abel have 4 ships so they must discard 1 ship. Gavrilo has 2 Arts of War cards so will get rid of Luchniki and Hermann has 2 boats and discards 1 leaving him with just 1 boat. The trials of a campaign season are hard on equipment and transportation assets.

Since we have not yet sieged and stormed a keep or had a battle we will endeavor to set one up for the next turn which we will start in my next post.

Categories
Nevsky Strategy Gaming Tabletop Board Game

Exploring Nevsky: A Board Game of Medieval Strategy / Part 6

Back to Russia for their 4th strategy card. The Russians now trail by 1VP. It is time for them to get more aggressive and take some risks. The Russians draw the Gavrilo command card again:

Gavrilo is going to have to leave the safety of Pskov and risk Hermann heading South towards Pskov. Staying put would protect Pskov from attack but does not earn any VP for the Russians and the Teutons have pulled out to a concerning lead. Gavrilo must head West. He has only 2 commands but the Arts of War card Druzhina grants him a bonus action giving him 3 commands to work with this turn.

Gavrilo will head due west into Teutonic lands leaving the safety of Pskov behind. First command will be to march to Isborsk, 2nd command to Kirrumpah and then the third command will be used to ravage Kirrumpah.

The ravage command grants 1 provender in empty regions and in any other space you get loot as well. Kirrumpah is a fortunately a town so in addition to the provender he gets loot. Loot works like just like provender except it is alive and can move slowly on its own. Loot is essentially livestock.

You can use both loot and livestock it to feed your army. This will allow Gavrilo to spend the just acquired loot and provender to remove the moved fought marker and avoid the consequences of starving troops. The ravage also grants 1/2 VP for Russia and cuts the Teuton lead to just 1/2 VP. Pskov is left behind, vulnerable with just its inherent garrison.

Gavrilo’s move puts him adjacent to Odenpah and the location of the Teutonic lord Yaroslav. Given that both Knud & Abel and Hermann have been active the entire turn it is a good bet that the Teutons are not planning on activating him Yaroslav.

Even if they put a Yaroslav’s command cards in their command deck he would not likely present a combat challenge to Gavrilo. He simply does not have enough troops and would very likely lose a battle should he try to attack.

The Teutons are now up for their 5th command card. They pull the 3rd and final command card for Knud & Abel.

Knud & Abel are going to continue to ravage Russian lands. With command 1 they move Northwest to Koporye, a Russian fort. The fort is immediately placed under siege, since there is no enemy lord present, the fort’s intrinsic garrison is doing the defending. The first siege marker is automatically placed when any lord arrives at an undefended enemy fortification.

Knud & Abel used their Arts of War capability to Ravage the fort at Kaibolovo located in the adjacent area to the Southwest. They then use their final action to Ravage Koporye in their current location. These actions total 2 VP, 2 Provender and 2 Loot from the two ravaged regions. Knud & Abel spend 2 provender to feed leaving them with 2 loot on hand. The Teuton side takes a 1 and 1/2 VP lead over the Russians.

Knud & Able have no more command cards in the deck so they are done for the turn. There is 1 Teuton card and 2 Russian cards left to play for turn 1. We will complete turn 1 in our next post and see how the Russians respond.

Categories
Nevsky Strategy Gaming Tabletop Board Game

Exploring Nevsky: A Board Game of Medieval Strategy / Part 5

The first turn card play continues with the Russian player. The Russians pull Lord Gavrilo from the command deck. Teutonic lords did not start with the usual strategy of immediately sieging Pskov so Gavrilo has been on the side lines thus far. Let’s take a quick look him:

Not knowing that the crafty Hermann was going to try a ravage strategy the Russian player absolutely loaded Gavrilo up with assets during the Arts of War and Levy phases. Gavrilo was given both Arts of War cards and he also mustered all three of his available vassals. This is all because Gavrilo sits in Pskov the usual early target of the crusaders. This has made Pskov difficult to take but has created problems now that the Teutons have chosen a more mobile strategy.

You can see why Pskov is a tasty target. It is close to the Teuton’s starting locations and Gavrilo is generally weaker than his Teuton opponents. It is very tempting as the Teutons to send Hermann & Gavrilo directly to Pskov for a siege and storm. This is why Gavrilo loaded up. The problem is what to do with him now that he is not likely to be defending his keep.

Gavrilo has 2 commands at his disposal. He is loaded for war with 9 units mustered. This means that moving and fighting costs him 2 provender. Gavrilo also mustered vassals instead of transports so he cannot take any provender when he moves. In short, early logistical decisions have hampered Gavrilo’s mobility.

We also need to consider the tactical situation. Gavrilo is between Hermann in the North and the yet unmentioned Lord Yaroslav in the West. Hermann is only 2 marches away from Pkov and has 1 card remaining. Should Gavrilo leave Pskov, Hermann could put it under siege and force Gavrilo to fight outside the Fortress. This would not be good. Worse when you consider that Yaroslav also nearby.

Yaroslav is not quite as yoked as Gavrilo but is probably strong enough to weaken Gavrilo enough for Hermann to complete the job. Here is Yaroslav’s mat for comparison.

It is both frustrating and boring but I think the best decision is for Gavrilo to stay put and see if Hermann moves out of range. The VP are still even so it is not yet time for rash decisions. Instead of sallying out Yaroslav can use a tax command.

Taxing will take Gavrilo’s entire card but gives him 1 coin token which can be used to extend the service of a Lord by pushing the service marker on the calendar to the right 1 space.

The Russians will be hoping to see Hermann’s card drawn. Since there are only 2 lords on the Russians side we know Yaroslav still has 2 command cards in the deck. Knowing Hermann is done for the turn would allow Yaroslav some much desired operational freedom. For now he is stuck holding Pskov.

Hermann’s card is not pulled. Instead, play returns to the Northern coast with Lords Knud & Abel.

Knud & Able have their own concerns. They have an large army (7 units) that requires 2 provender to feed and they only have 2 commands per card. They have to get a lot done with just 2 commands. The raiding Arts of War card will help with this situation. Here is Knud & Able’s mat:

The Raiders Arts of War card will allow Knud & Able a free ravage action as long as it is to an adjacent location connected by trackway. The order of operation for this turn is important. They will need to move first then ravage since they do they did not levy cart transportation and can’t take provender.

For command 1 Knud & Abel march to Vod. They use their raider Arts of War card to ravage Ingria which is adjacent by trackway. The ravage grants 1/2 VP and a Provender. Then with command 2 they ravage Vod where they are located for the 2nd Provender giving them a total of 2. This is enough to feed their troops and remove the moved fought marker. The 2nd ravage also earns another 1/2 VP for the Teutons.

That ends Knud & Ables 2nd command card. The score stands at 2 1/2 points for the Teutons and 1 1/2 points for the Russians. Gavrilo is going to need to start taking some risks or the game will be over.

We will take up the action with the Russians in the next post.

Categories
Nevsky Strategy Gaming Tabletop Board Game

Exploring Nevsky: A Board Game of Medieval Strategy / Part 4

We begin with the Russian Lords playing their 2nd card. The Russians draw Vladislav again. We will continue with our plan to cross the border and begin ravaging the Teutonic lands. Vladislav uses his first 2 commands to continue his march westward. He uses his last command for the turn to ravage Wierland. This gives him a provender and 1/2 VP for Russia.

Since Vladislav marched he gets a moved fought counter. Conveniently he just picked up a provender from the ravage so he can once again feed his hungry troops.

Incidentally, large armies with more than 6 units require 2 provender to remove the moved fought marker. This is going to be a problem for Knud & Able as they have 7 units.

Vladislav has used all of his actions and fed his troops so the command card is discarded and play goes back over to the Teuton player. The Teutons draw the next card from their command deck:

Hermann is up again. He has three actions and an interesting decision to make. He is in range and could intercept Vladislav and try to put an end to his counter-raiding with a battle. To do so Hermann would have to march twice (using boats) to reach Narwia then take the track to West to intercept Vladislav in Wierland.

Hermann, however, would have to abandon his provender in Narwia because he did not levy carts so can not haul provender across land. This means he would arrive in Wierland without provender to feed his troops.

The other problem with this option is that Hermann would have to forgoe ravaging in Russia which was the game plan. No ravage, no VP.

Hermann decides to stick with the plan. He uses a command to ravage his current location at Zhelcha River. Next, he marches North to Plyussa River but must leave behind the provender he obtained by raiding Zhelcha River. Again no carts so he can’t haul all of the food. The final command is used to ravage Plyussa River and by doing so obtains 1 provender and can feed his troops. The 2 ravage commands give the Teutons a total of 1 VP.

We have briefly discussed the consequences of hungry troops in past posts. Given that Hermann had to abandon provender this turn, I thought it would be good to explain how hungry troops reduce a lords service.

There is a calendar on the top of the game board that is used to track lord service time, game turn and victory points. This image is the part of that calendar covered by this scenario.

We are currently in the Campaign Phase of Turn 1. You can see the blue circled marker currently on its “campaign” side in box 1. You use this marker to keep track of the turn and the phase. It’s on its “Campaign” side; the other side reads “Levy.” When the turn advances we will flip the marker back to its levy side and place it in the turn 2 box.

The two cylinders in box 1 are lords that could have been potentially mustered in this scenario. We did not spend levy actions to attempt to muster either of these lords so they remain in their keeps.

Each lord also has a rectangle shaped service marker that bears that lord’s unique crest. Russian markers are in white and Teuton markers are black. The service marker shows the lord’s service rating and fealty roll. The service rating is the number of turns the lord will serve before returning home. The dice icon is the fealty roll. It shows the number or lower required on a roll to muster that lord. It is good that Knud & Able started the scenario mustered because you would need a roll of 2 or lower to muster them.

A player that can’t feed his troops after move or fight commands must shorten the affected lords service by a turn. To show this, the service marker is slid left on the calendar to track the loss of service time. If a lords service marker is in the current turn’s box, then that lord must disband unless the player can pay to extend the service. Payment to extend service is usually with coin gained through the tax command.

Categories
Nevsky Strategy Gaming Tabletop Board Game

Exploring Nevsky: A Board Game of Medieval Strategy / Part 3

It is the Russian’s turn to pull a card from their command deck. We pull Lord Vladislav’s activation card. He will get 3 commands. The problem is trying to figure out what to do with these commands. We know the Teuton Lords will continue to attack and raid. We need to find a way to counter the Teutons before they accumulate too many victory points through ravaging. Let’s take a look at the Northern part of the map:

Hermann is active to the South but he levied boats for his transport so it is likely he will stick to the waterways. He is blocked from going North or East from his current location unless he drops his provender. Hermann did not levy carts. Knud & Abel are in the Far west but they have access to ships. Knud & Abel’s play mat shows their muster activity:

Knud & Abel mustered 1 vassal and 2 ships. They have enough ships to sail with all the cavalry units on their mat. Teutons need 1 ship per horse unit and this is exactly what they mustered. Three ships to haul the horses and 1 for the provender. Odds are good they will sail with their first activation. I have this on good authority since I am playing both sides of the game. Sailing takes the whole activation card but would allow Knud & Abel to land at any northern settlement with a port.

It is questionable whether Vladislav has the troops to win a battle against Knud & Abel who have powerful knight units. Vladislav’s levies are less capable:

The triangle pieces are cavalry units and the rectangle pieces are foot units. Here is a chart that shows the capabilities of all the units in the game:

The 4th column shows armor ratings for the various units. Any unit suffering a hit makes an armor roll using these ratings. A dice that comes up in the range listed on the armor table cancels the hit. You can see here that knights cancel hits with a roll of 1-4 making them the most armored unit in the game and very difficult to kill. Vlad cannot go toe-to-toe with the Teutons as things currently stand, the knights are too powerful. Losing a battle would give even more victory points to the Teutons so we need to find another way.

Instead of defending and battling we could focus on counter-raiding the Teutons. We can ravage the west and claim victory points to cancel their effort to raid. To ravage we need to be near Teuton territory so that means we need to move West.

This move puts Vlad on the border where he can use future commands to counter raid. Vlad used all three commands to march. This gives him the dreaded Moved Fought marker so he must feed his troops. He has a provender on his mat and uses it to feed his troops which removes the marker. He is fresh out of provender so finding more will be a priority during his next activation. There are command for this problem.

This ends Vlad’s activation and play returns to the Teutons who may once again draw a card.

The Teuton player draws Knud & Abel. Note that This Lord(s) only gets 2 commands in each activation. They are slightly less capable than Hermann or Vladislav. As anticipated Knud & Abel take the sail command.

This action (as noted in the requirements above) takes the entire command card to execute. Knud & Able sail up the black sea and land deep behind Russian lines at Neva. Sailing gives a unit the moved fought marker so Knud & Able spend their only provender to feed their sea sick troops.

Play moves back to the Russians. We will pick things up in the next post with the Russian response.

Categories
Nevsky Strategy Gaming Tabletop Board Game

Exploring Nevsky: A Board Game of Medieval Strategy / part 2

Since my last post the remainder of the lords on the map have used their muster actions. The two Russian lords mustered their own vassals to increase their troop strength. The Teutonic knights also mustered vassals and in addition, Lords Knud & Abel mustered ships.

Now that we are properly geared up, the Teutonic invasion of Novgorodian Russia can begin. Let’s get oriented first:

The Teuton Lords are represented by black cylinders on the map; the Russian Lords are white cylinders. You may have noticed the gold ring around Herman’s marker. This denotes his status as a marshal. He can command other lords (take them with him) during his actions.

The map shows Teuton lands with a grey tint while the Russian lands have a reddish tint. To take levy actions a lord must be in a friendly locale when the Levy Phase begins. The only way to make an enemy side of the map a “friendly locale” is to conquer an enemy stronghold.

To win the game you must collect more victory points than your opponent. You gain those victory points by ravaging enemy holdings, destroying their armies and conquering their strongholds. In this short scenario the Russian player starts with 1 VP already in the bank. The onus is on the Teuton Lords to invade. Let’s get to it!

Before we start stomping about the map each side must create a command deck. You build command decks from command cards; each lord has three. This is what one of Hermann’s command cards look like.

Lord Hermann’s Command Card

It is currently summer so our command deck needs to have 6 command cards. The deck is made from command cards for the lords who are currently in play. You make a new command deck for each successive campaign season.

Players will take turns drawing cards from the command deck to determine which lord is up next. The cards also show the Lords Command Rating. Hermann has a command rating of 3 which represents the number of commands he may take when his card is drawn. Players alternate drawing command cards from the deck until they are gone. Once both players’ decks are empty, the Campaign Phase of the turn ends.

Here is what is in the Teuton’s command deck looks like:

Teuton Command Deck

In Nevsky the Teutons go first (they started the crusade) so we draw Hermann’s first command card and he gets to select 3 actions from the following list of possible actions:

Commands Player Aid

In a previous play through of this scenario I moved Herman directly to the nearby stronghold of Pskov and placed it under siege. This did not work out well for several reasons. First, you only have 2 turns in the scenario to siege and storm. It is barely enough time so getting it done requires quite a bit of luck. That strategy leads to an all-or-nothing storming of Pskov for the win or defeat. For this playthrough, I am going to try instead to ravage my way to victory. I have no idea if this will work but I think its worth trying. We will soon see.

Hermann has the first card:

Herman takes the march action and moves (1) to Uzman by boat. The boat transport is necessary because Hermann is taking provender with him and it must be transported. Moving also tags him with a moved fought marker.

Next Hermann will ravage Uzman (2) which gives the Teuton side 1/2 VP (victory point) and Hermann gets another provender. This gives him a total of 2 provender which he can carry because he has the 2 boats on his mat. For the last command, Hermann will march again (3) to Zhelcha River where he intends to ravage when his next command card is drawn. Herman’s mat has changed since the start of his turn and now looks like this:

Since Hermann has a moved fought marker on his mat he must expend a provender to feed his hungry vassals and their troops. Hermann can then remove the Moved Fought Marker and end his activation. If Hermann could not feed his army, it becomes more likely his troops will quit the field and return home. Having unfed troops causes service duration reductions.

The Russian player is up next and will need to figure out how to respond to the ravage strategy. I will cover the Russian response in my next post.

Categories
Nevsky Strategy Gaming Tabletop Board Game

Exploring Nevsky: A Board Game of Medieval Strategy / Part 1

Nevsky is a board game designed by Volko Ruhnke and published by GMT Games. It is Volume I in the Levy & Campaign series of board games that explore operational aspects of medieval warfare. Nevsky explores the conflicts between the Teutons and Rus involving the game’s namesake Alexander Nevesky Nevsky whooped up on catholic crusaders in the 11th Century and became a Russian household name.

Napoleon said, “An army marches on its stomach.” A quote highlighting the often overlooked importance of getting necessary things to soldiers. Nevsky is a game that explores operational mechanics for medieval armies. In a game of Nevsky, you fail to pay, supply and support your troops at your peril. Nevsky also features opponents with differing capabilities. The Teutons and the Rus field very different armies. Learning how to best take advantage of the strengths of each army and manage their respective weaknesses is a big part of the game.

I would be remiss if I didn’t mention that the physical copy of the game is super cool. Nevsky uses uniquely-shaped, painted, wooden pieces to represent different classes of soldiers. These pieces are satisfyingly tactile to manipulate and shuffle about. All of the components are well-made and thematic.

The game art is perfectly evocative of the period and serves to give the game a satisfying medieval vibe.

I find all of this to be super interesting and so I thought I would play a game and share it here in my blog. I will be using the excellent Vassal module to play. While I do own a copy of the game and generally prefer to play with the physical version, sharing it would involve photography. I am not much of a photographer and using Vassal makes getting media for the blog much easier.

The game involves cards and quite a bit of hidden knowledge. This makes playing solo challenging. I will do my best to divide my brain equally between Teutonic and Russian. It should work well enough for this playthrough. Just know that Nevsky is designed for two-players and is way more fun enjoyed with another human.

I will be playing the short introductory scenario called, “Pleskau-1240” that lasts 2 game turns. This write-up is not a tutorial. There are excellent tutorials available on YouTube should you need one. I just wanted to share some gameplay of a fun game that I like. I will try to explain some of what I am doing as I go.

Levy Summer 1240

The game starts with each side randomly drawing 2 cards from the Arts of War deck. The Teutons pull:

At the start you get to add capabilities found on the bottom half of the card. The top half of the cards are for later so you can disregard it for now.

The Teutons get to add a raiding capability to one of their lords. What lord does not want bonus raiders? The other card adds the commanderies for the Teutonic Lords. Normally a lord has just one commanderie located at their keep. The card Ordensburgen grants additional bases of operation for all Teutonic Lords. We will see the usefulness of this capability as we play. Note the black crossed shield herald, you will see it on the map soon. The shield will be found on these bonus bases.

Let’s see what the Russians get:

Russian capability cards

The Russians get Luchniki (massed archers) and Druzhina (Elite retinue) both sound like fun. Since the cards have the “This Lord” wording we will pick a lord whose heraldry is found on the card to enhance with the card.

Lord Hermann’s “Lord Mat” before mustering

Next each lord in play gets to muster. A lord may muster a number of times equal to their lordship score. A lords scores are found on their lord mat. Lord Hermann gets 3 cracks at mustering. The following muster actions are available:

  • Roll to try and muster another lord
  • Muster a vassal from their mat
  • Muster a transport asset (boat, cart, sled, ship)
  • Muster an arts of war capability (select a card)

I will muster for Lord Herman while humming Eye of the Tiger. Your gear up theme music may vary. Lord Herman will do the following 3 actions.

  • Muster one of his own vassals
  • Muster a boat
  • Muster a boat
Lord Hermann’s mat after he has mustered for turn 1

Hermann added a vassal giving him more wooden bits (troops) and added a “2 x Boat” marker to his transport capabilities. With more troops and pile of boats Lord Hermann is locked and loaded.

Once all of the Lords have mustered the game goes from the Levy phase to the Campaign Phase. I will muster the rest of the lords so they are ready to begin the next phase. We will discuss campaigning in the next post.